The Year comes to an end with big doubts on the Architecture Industry but with hope of a Better 2009.
Català - Castellano
Just wanted to wish a Happy New Year to all CAD Addict users who joint this community during 2008, and hope for a better 2009 to everyone in the Architecture Industry. Hopefully by the end of Next year things could be a bit better and less layoffs and company closing will be happening.
Although many forecasts are very pessimistic about the evolution of the economy next year do not forget that if you make yourself indispensable wherever you work you will have a change to overcome the crisis.
As a New Year wish I intend to get even more serious into this blog, put as much time an effort as I can, try to improve both the design and the contents of this site and hopefully reach a wider audience.
Remember that you can stay update Subscribing to the blog updates in a reader or entering your email address in the box found on the upper right corner of this website.
Show me more...
SketchUp: Import and Export Scenes
Did you know that you can import and export the Scenes from one file to another? It is (not) a default option in SketchUp.
Català - Castellano
Saving Scenes is an important step on the design process. As the design evolves, it is a good option to show the same view of several options to easily compare them. Trying to mimic a view manually can be quite time consuming. We can of course open a drawing that has the view we want, erase everything in it, and paste in place the new model.
But there is a better way to get views from one file to another. SketchUp has an option to Import and Export Scenes (Pages).
Update: I was using my office computer and I thought this was a default option but it seems that it is not, you need the PageExIm.rb Plugin by Rick Wilson. It costs $5 and can be found here. Anything else in the post is still valid once you have this Plugin.
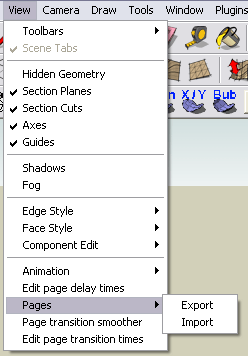
You just need to go to View --> Pages --> Export. You will save a file with the extension .SUP (for SketchUp Pages I guess). Form another file you can easily import those views by going to View --> Pages --> Import, and selecting the previously saved file.
Remember that to be able to use the views saved both models have to be placed in the same location.
Show me more...
SketchUp: Export to Maxwell Problems
If you can't find the Maxwell type of file when trying to export from SketchUp you might find the solution here.
Català - Castellano
For some reason, me and some other colleagues have been experiencing problems to Export to Maxwell from SketchUp. We followed all the steps to install the Maxwell Export Plugin for SketchUp but for some reason the .MXS type of file didn't appear as a file type in the Export Dialog Box.
For some reason the installation of the plugin didn't work 100%. I got in touch with Next limit Tech Support (that I have to say has a phenomenal response time) an they told me how to solve it. Apparently, the installation of the plugin was lacking one file. The solution is copying the mfc71.dll file from SketchUp installation folder to C:\Windows\System32. That solved the issue.
I haven't figured out if the problem comes from an issue on the plugin setup file, or some problem with our computers, but the solution worked. If you are having a similar problem try this, but first be sure that you check if the .MXS type of file is there or not. It happens to be on top of the list in the export dialog box, so sometimes people think that is not there when the only thing they need is to scroll up on the file type list.
Show me more...
AutoCAD: Missing "Open", "New" and "Save As" Dialog Boxes
What happened to the Save As Dialog Box? How do you get it to appear again if it is missing?
Català - Castellano
More solutions found thanks to colleagues asking me questions. Today Alejandro asked me if I knew how come he couldn't see the "Save As" dialog Box. First thought was that since he got AutoCAD recently installed all the Dialog Boxes might be out of the screen area.
But that wasn't the problem. A bit more of research allowed me to find out that the tricky System Variable causing trouble there was FILEDIA.
FILEDIA can be set to either "1" or "0" values.
Show me more...
Català - Castellano
More solutions found thanks to colleagues asking me questions. Today Alejandro asked me if I knew how come he couldn't see the "Save As" dialog Box. First thought was that since he got AutoCAD recently installed all the Dialog Boxes might be out of the screen area.
But that wasn't the problem. A bit more of research allowed me to find out that the tricky System Variable causing trouble there was FILEDIA.
FILEDIA can be set to either "1" or "0" values.
- If the variable is set to 0, no Dialog Boxes will be shown (i.e. you will have to enter the information you would normally enter through a dialog box directly in the command line).
- If the variable is set to 1, the Dialog Boxes will be shown normally.
Show me more...
Labels:
AutoCAD,
System Variables
This Christmas Buy Knowledge
Buy some books that will make you work smarter this holiday season.
Someone said once that a smart person is that one that invests more money in things that will go inside his head than in things that stay outside. Now is your turn to buy some knowledge for yourself or for anyone you know.
The main CAD programs have several Books that will let you improve the way you work with them. Although books are never as good as practice, practice and practice, they are a good reference to have in hand to learn new features of a program. Here are some of the ones that seemed the best deals for me this end of 2008 for some of the programs you might be trying to
AutoCAD
Beginner - AutoCAD 2009 for Dummies
The "for Dummies" series with its plain language let you learn the basics of almost anything. A great deal for its price (around $16 / £10). Sometimes as I often write ere we overlook the basics of programs missing some fundamental tricks to work smarter. here you´ll find a lot.
or
Expert - AutoCAD 2009 Bible:
The Bible by Ellen Filkenstein has been for years a reference Book for those who want to go deep in their AutoCAD Knowlege. Even the latest 2009 version is quite affordable (the book sells for around $30 or £20) and has plenty of knowledgeable tips. All you need to know (besides what you read here) about AutoCAD.
or
SketchUp:
Beginner - SketchUp For Dummies
With about 250 pages to get introduced to all the basic SketchUp features and some more to start using some other intermediate procedures.I think the "for Dummies" series can lack sometimes a bit of seriousness and the language is not always very clear, but in this release they did a pretty good Job.
or
Advanced - SketchUp Advanced Tutorials
Bonnie Roskes publishes her own books. (See a previous posts we talked about the books for kids). This one is the one addressed to the ones who want to know more about this fantastic software. Here I want to stress again that there is no better training than practice. But buying a book doesn´t hurt anyone I guess.
Show me more...
AutoCAD: Full power of the LAYFRZ command
Trouble freezing layers on XREFs or Blocks? The solution is on the command line
Català - Castellano
Many commands in AutoCAD have more options than we really know. We just need to take a look at the command line once the command is active to find these extra options. LAYFRZ is not an exception to this rule.
We often have trouble trying to freeze layers within XREFs or Blocks. THis is because of the hierarchy system of AutoCAD, but also because the LAYFRZ command might be configured wrong.
Once we start the command, we have the chance to type "S" for settings and we will access a world of possibilities. What is basically important to understand is the set of options regarding Block Nesting.
We have b (for Block) that will do 2 different things:
N (for None) would freeze the layer containing the block or Xref.
I think it is good to remember that with any tool there might be some extra options that we are not considering that we can discover by paying some attention to the command line.
Show me more...
Català - Castellano
Many commands in AutoCAD have more options than we really know. We just need to take a look at the command line once the command is active to find these extra options. LAYFRZ is not an exception to this rule.
We often have trouble trying to freeze layers within XREFs or Blocks. THis is because of the hierarchy system of AutoCAD, but also because the LAYFRZ command might be configured wrong.
Once we start the command, we have the chance to type "S" for settings and we will access a world of possibilities. What is basically important to understand is the set of options regarding Block Nesting.
We have b (for Block) that will do 2 different things:
- If a selected object is nested in a block, freezes the layer of that block.
- If a selected object is nested in an xref, freezes the layer of the object.
N (for None) would freeze the layer containing the block or Xref.
I think it is good to remember that with any tool there might be some extra options that we are not considering that we can discover by paying some attention to the command line.
Show me more...
SketchUp: How to Mirror Objects.
There are several ways to mirror objects in SketchUp
Català - Castellano
Mirror is not a standard tool in SketchUp, but that is probably because there are several ways to Mirror objects using other methods. There are to me 3 methods to mirror objects. Two of them can be done with the standard SketchUp installation, the third one (and probably the best) requires a Plugin. Let's see the 3 of them:
Show me more...
Català - Castellano
Mirror is not a standard tool in SketchUp, but that is probably because there are several ways to Mirror objects using other methods. There are to me 3 methods to mirror objects. Two of them can be done with the standard SketchUp installation, the third one (and probably the best) requires a Plugin. Let's see the 3 of them:
- We can select the object we want to mirror, right click on it and select "Flip Along:" This will give us the chance to select which plane (red, green or blue) of the object to use as a mirror plane. The negative part of this is that yo can't select the mirror plane. The mirror plane has to be one of the planes defined by the center of the object.
- We can use the Scale Tool. Select one of the grips (using the grips on the center of the faces of the object's bounding box is the best way to go) and type "-1" as the scale value on the Value Control Box (VCB). Again, we can´t control the mirro plane, it has to be one plane defined by the faces of the bounding box of the object.
- The third method is to use the Mirror.rb Plugin. This plugin is very easy to use and allows us to select the mirror plane and also to choose if we want to keep the original object or delete it after the mirror operation. It is by far the best way to go. To use the plugin (after saving it to your plugins folder) select the object you want to mirror and go to Plugins --> Mirror Selection. Then you will need to pick the 3 points that define the mirror plane, and at the end you will have te option to choose to either keep or erase the source object. Easy and simple, and a time saver.
Show me more...
SketchUp Plugins: Extrude Lines
Did you ever wanted to extrude just a line in sketchUp? There is a Plugin for it
Català - Castellano
Update: This is an old Plugin, there is a newer set of tools by TIG and a Plugin in it called ExtrudeEdgesByVector.rb that does this process much easier.
SketchUp has the Push / Pull tool that basically extrudes surfaces into volumetric objects. This, in a way, can work to extrude lines by extruding the surface and erasing the parts we didn't want to be extruded.
But there is a better way to do that in some cases, and this is to use the Extrude Lines Plugin. This Plugin simply extrudes a line or a set of lines into a surface.
See the next two images to see how from a line we got a surface by using this plugin.
Note: The Plugin shows @Last as Author of the Plugin, if anyone knows the original download page let me know.
Show me more...
Català - Castellano
Update: This is an old Plugin, there is a newer set of tools by TIG and a Plugin in it called ExtrudeEdgesByVector.rb that does this process much easier.
SketchUp has the Push / Pull tool that basically extrudes surfaces into volumetric objects. This, in a way, can work to extrude lines by extruding the surface and erasing the parts we didn't want to be extruded.
But there is a better way to do that in some cases, and this is to use the Extrude Lines Plugin. This Plugin simply extrudes a line or a set of lines into a surface.
See the next two images to see how from a line we got a surface by using this plugin.
The flaw of this plugin is that when trying to extrude arcs, it will consider the arch as a set of lines, producing an extruded surface like the one in the image below, with a lot of edges shown.
Personally, if I have to extrude arcs I use the Weld Plugin and the standard Push Pull operation.
You can download the Plugin here. To use it save it into the Plugins folder, select a line or set of lines and go to Plugins --> "Extrude Lines, vector by 2 points".
Note: The Plugin shows @Last as Author of the Plugin, if anyone knows the original download page let me know.
Show me more...
AutoCAD: Avoid sending the whole file path when plotting
Control if you send to the plotter/printer the whole path of your file or just its name to make it easier to deal with plotting cues.
Català - Castellano
When multiple users send many files to a single plotter, it might be hard to see the files on the plotting cue because of the long paths associated to them. Reading RobiNZ Blog I came across the system variable that controls whether we send the whole path to the printer / plotter or just the file name.
This is FULLPLOTPATH. The default value is "1" which means that we are sending the whole file path to the printing cue, while if we set the variable to "0", only the filename will be sent.
Show me more...
Labels:
AutoCAD,
Printing,
System Variables
First SIGGRAPH conference in Asia
The first ACM SIGGRAPH Conference and Exhibition on Computer Graphics
and Interactive Techniques in Asia opens in Singapore on 10 December 2008
From Decmeber 10th to December 13th the Suntec Singapore International Convention & Exhibition Centre is going to host the first Asian edition of the ACM SIGGRAPH Conference. The US version of this conference that aims to Computer Graphics professionals took place last Ausgust in Los Angeles. Next Summer New Orleans will host SIGGRAPH 2009 from 3rd to 7th of August.
For more information visit SIGGRAPH.
Show me more...
CAD Addict featured on CAD Digest
CAD Digest has linked to some of the articles published in this web site for the first time
After almost 6 months of serious blogging its good to start seeing other websites linking to the posts published here. CAD Digest, that compiles useful CAD posts from other websites has featured some of the posts.
Besides the satisfaction of knowing that more people are finding useful tips on this website, I'd just like to welcome the new readers and encourage all of them to come back often for new tips or to subscribe to the RSS feed using the big button on the upper right corner.
Again, welcome everybody and please comment if you feel like.
Show me more...
Labels:
General
Photoshop: Rotate Guides 90 degrees.
Do you want to turn one of the guides 90 degrees? Easy and simple.
Catala - Castellano
This is the kind of thing you come along by mistake. I was trying to copy the contents of a layer in one of my Photoshop files (Alt + drag) and by mistake I pressed Alt and clicked on one of the guides I was using to align my image.
Magic!! The guide turned 90 degrees with the rotation point were I clicked.
I don´t know how useful this can actually be, I just thought I'd share.
Show me more...
Labels:
Photoshop
AutoCAD: Relative coordinates
Remember some of the basics to make your drafting experience easier. The @ sign is your friend
Català - Castellano
Some of the basics of how AutoCAD works tend to be forgotten. One of this is the capacity to enter relative coordinates by using the @ sign before the coordinates. This will allow us to set a point, line end point, etc a certain distance from the point we clicked before.
This is specially useful when we draw rectangles using the RECTANGLE command. If we know the dimensions of the rectangle we want to draft, we can just click on the point we want one of its corners to be and enter @X,Y (being X=width and Y=height). By entering the @ sign the coordinates of the second corner will be relative to the first one, while if we didn't enter the @ sign, entering X,Y only, we would be entering coordinate points related to the UCS 0,0,0.
As a quick example, if we want to draw a rectangle 1 unit high by 2 units wide, we will do the following:
Show me more...
Català - Castellano
Some of the basics of how AutoCAD works tend to be forgotten. One of this is the capacity to enter relative coordinates by using the @ sign before the coordinates. This will allow us to set a point, line end point, etc a certain distance from the point we clicked before.
This is specially useful when we draw rectangles using the RECTANGLE command. If we know the dimensions of the rectangle we want to draft, we can just click on the point we want one of its corners to be and enter @X,Y (being X=width and Y=height). By entering the @ sign the coordinates of the second corner will be relative to the first one, while if we didn't enter the @ sign, entering X,Y only, we would be entering coordinate points related to the UCS 0,0,0.
As a quick example, if we want to draw a rectangle 1 unit high by 2 units wide, we will do the following:
- Enter RECTANGLE command (or click rectangle icon if you use icons)
- click to select the point of the first corner
- enter @2,1
Show me more...
Labels:
AutoCAD,
relative coordinates,
UCS
AutoCAD: Creating a Tool Palette with multiple Blocks at Once
You don't need to manually add each Block to a tool palette, it can be done with just a few clicks.
Català - Castellano
Not so long ago, I wrote a post explaining how to transfer Tool Palettes from one computer to another. The following post also explained how to create a new group of palettes.
What I found out today is how to create a new Palette from a file. This is very useful if we want to generate a palette with a lot of Blocks that we have stored in a single file. With just a few blocks, or with blocks in different files, we would manually drag and drop the blocks into the new palette. That becomes tedious if we have to do it for a lot of blocks. The solution is quite simple:
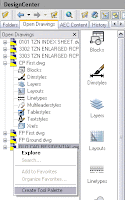
We make sure first that we have active the group of palettes where we want to add the new one. We also need to have the drawing containing the Blocks open. From the design center ("Ctrl + 2" or ADCENTER command) we select the file with the blocks we want to add, right click it and select "create palette". See the image for a visual aid to do this.
The result will be a palette with the anme of the file, and ALL the Blocks that the file contained, organized alphabetically.
Thanks to Aarti for this tip.
Show me more...
Labels:
AutoCAD,
Blocks,
Tool Palettes
Photoshop: Zoom using the scroll wheel
Did you know that you can use the scroll wheel to zoom in and out in Photoshop?
Catala - Castellano
Changing from one software to another is sometimes annoying. There are certain things we give for granted that it is hard to get use to not have them in some software.
One of this things is the zooming feature using the Scroll Wheel. It is a very standard feature in most CAD programs. But it is not the default setting for Adobe software.
Luckily there is a work around. If we want to be able to use the scroll wheel to zoom in and out in Photoshop, we have two options. We can get used to press Alt (option in MAC) and then use the scroll wheel. This is the default setting in Photoshop. Or we can configure PS to zoom in and out automatically when we turn the scroll wheel.
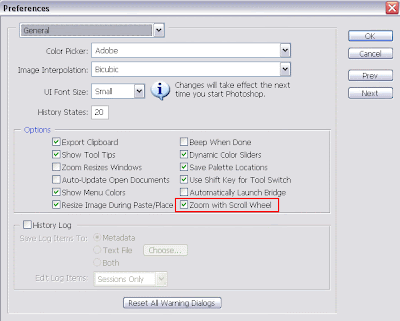
To do that we simply need to go to Edit --> Preferences --> General. And check the box "Zoom with Scroll Wheel". Easy and simple, see the image below.
Show me more...
Labels:
Photoshop
SketchUp: VRAY plugin works also on version 7
ASGVIS has announced that their VRAY plugin for SketchUp is ready to work on SketchUp 7 too.
Castellano - Català - Deutsch
ASGVIS released some time ago a plugin to be able to use VRAY render inside SketchUp. Recently they announced that the plugin itself is ready to be used in the recently released new version 7 of SketchUp.
The only tricky part is that you can not have the plugin running for both versions 6 and 7 at the same time. So, if you are just planning to try version 7 but keep version 6 maybe you want to hold on before switching Vray t thenew version.
I tried it with version 6 some time ago and I sincerely didnñt manage to get good results. But the gallery that ASGVIS has only proofs that it is proably just due tome not putting enough time into it.
You can download a free 30 day trial here and give it a shot. The license is nearly $800 so you better be sure it is what you want before investing that money, specially considering that competing NextLimit sells its software Maxwell Render with far more functionality plus all availale Plugins for $995.
Show me more...
AutoCAD 2009: Disabling the annoying information pane
Turn off that white information pane that shows when you hover over an XREF, Block, etc
Català - Castellano
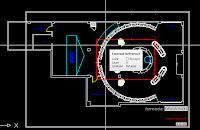
Sometimes new features are more an annoyance than a real benefit for the user. AutoCAD 2009 has some of these. One of them is that white box or pane with information that shows when you keep the cursor over an XREF, Block or almost any type of object.
AutoCAD 2009 has awesome new features and although this one might be useful in some way, I find it extremely annoying. Well finally someone told me how to disable it. It is simple.
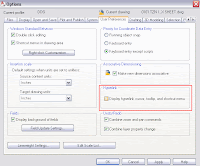
Go to Tools --> Options --> User Preferences. There, uncheck the box that says "Display hyperlink cursor, tooltip, and shortcut menu.
I haven't found any system variable for this (i think there is none so far) so it will have to be disabled by accessing the OPTIONS dialog box. Click on the image to get a view of the Tab and box you need to uncheck to disable this feature.
Update: There´s been a couple of comments saying this trick is wrong. It is not, everything I post here is verified by myself, I repeat, I only post stuff that I checked that works. I think the confusion of some folks is to what d0 I mean by "annoying white infomation pane" See the picture please on the right to understand what I meant.
Show me more...
Labels:
AutoCAD
AutoCAD Architecture: Hiding 2D objects (actually obscuring them)
Trying to find a way to hide single objects I came across a way to obscure them.
Català - Castellano
Someone told me today at work that Microstation has an option where you can hide objects regardless of their layer. I really don't know if that is true (haven't used Microstation for almost two years) but I was asked to find a similar command in AutoCAD. Be aware, I wasn´t successful.
But every failure has a part of learning, in the process, I discovered the AEC Tool: Obscure. You can access it by selecting geometry -- Right click -- AEC Tools -- Obscure. Or you can directly type the LINEWORKOBSCURE command.
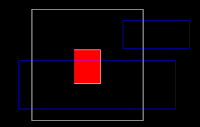
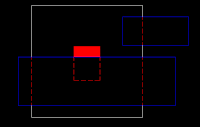
See the two pictures below to appreciate what this command does.
On the image above we want to hide the withe and red geometry behind te white geometry. The process is simple. We select the geometry we want to show as hidden (in this case the white and red rectangles), right click -- AEC Modify Tools -- Obscure. Then we will be asked to select the geometry that is going to create the obscuring boundary. We select the two blue rectangles. Done, see the result below.
See how all the "hidden" geometry becomes dotted lines, and how even the solid hatch filing the central rectangle is "hidden" behind the blue rectangle. I say "hidden" because there is nothing actually hidden here, what ACA does is break the original geomtrey using the boundaries we gave it, and change the geometry inside those boundaries to a layer with hidden line properties.
It ia a useful command, but don't forget that this is pure 2D. I am still tring to figure out a way to configure the properties of this hidden geometry layer. By default the layer is called Aec-Detail-Hidden, but I know that this can be modified (as wellas the layer properties) because in my company when using this command the hidden geometry comes in one of our standard hidden layers. Will investigate a bit more and post the solution if I find it. Or do you knowhow to do it?!?
Show me more...
Labels:
AutoCAD Arch
SketchUp 7: New Features and Download Link
See the new features of the latest SketchUp version.
Català - Castellano
Thanks to Jim and his SketchUp Plugins blog I got the link to the video below that explains the new and very cool features added to the new SketchUp 7.
I have to confess that I didn't even know that version 7 was already out (I only know that I know nothing). So if you feel like trying all these new features (and dynamic components look like the most awesome addition so far) here is the link to the download page.
Update: today mornig (Nov 17th) google has oficially released SketchUp 7 on the official sketchup blog.
Show me more...
Learning to Use Adobe Products
Adobe has a grat video Library to learn to use their products
Català - Castellano
I started updating my portfolio this weekend (with the current state of the Architecture Industry you never know when you will need to have it ready) and I wanted to use Adobe InDesign because I had read is the best software for composing great looking professional layouts.
My knowledge on this software is so far very limited so I wanted to learn from tutorials or whatever resources are available. Looking through the help files, I found a link to video tutorials.
The best thing of this finding is that the video tutorials are not limited to InDesign, but to all the products Adobe has in its Portfolio. I followed 8 of the videos about InDesign and I can say they are very easy to follow and each one concentrates on one topic. I think it is a great resource to learn some basics and some advanced tricks so I´ll be using this on the next months. Anything that I find worth mentioning will of course be posted here.
Hopefully if I get good enough on using InDesign, I might even start a new category dedicated to this program. Architects don´t generally use InDesign (at least no company where I've been ever had it installed) but I believe it is a great tool.
Show me more...
AutoCAD: Editing Aliases "on the fly"
With this command, you don't need to acces acad.pgp to edit your aliases
Català - Castellano
There is an Express Tool Command, ALIASEDIT, that allows us to edit the Aliases we use in the current session of AutoCAD. Previously, we had to acces acad.pgp, change the Aliases there and restart AutoCAD.
With the command ALIASEDIT you can change any Alias while working, making the process much simpler (and also reducing the chances of screwing up the acad.pgp file).
Changing and adding Aliases is to me the number 1 step to do to improve your wirk speed. Some people prefer to use icons or access commands throught the menu bar, but to trully speed up your workflow you should alwas have a hand on your keyboard and another on the mouse.
ALIASEDIT can also be accessed through the Menu Bar.
Express - Tools - Command Alias Editor
I am going to post soon a list of the ALIAS modifications that I use that make me work more efficiently. And remember that not so long ago i published a List of Express Tools.
Show me more...
Labels:
AutoCAD,
Express Tools
How far could you go with Architectural Software?
You learn AutoCAD, then Photoshop, then SketchUp, then Revit, then 3DMax...See how far others have gone...
Català - Castellano
If you followed similar steps as I did, probably you started in School learning som CAD software. I was actually taught Microstation SE back in 1998. Together with this you probably learned some image editing program like Photoshop or Corel Draw to improve your presentations (I actually love the discussions between people with vector shaped brains because they learned Corel first and those with Raster shaped ones because they stated with Photoshop).
Soon after that comes the attempt to go 3D, not only for presentation purposes, but also from the design point of view.
Before @last software released SketchUp (yes, Google didn't create SketchUp, they bought it in 2006) crossing the 3D threshold was too much for many. Many of my friends back in School would say "I can't do 3D", nowadays it seems to me impossible to imagine an architecture school without almost all the students using SketchUp or something similar to design their buildings.
The use of 3D modeling programs is vital as I see it in the design process. Some old school guys say that real models are better, but I respectfully disagree. While a real model is a great tool to show to clients and to get a sense of scale of what you are doing, it rarely allows you to understand the real effect of the buildings and spaces you are creating. Modeling in the computer allows you to get that view from the human position as if you were in the project.
The hard step to do next is to have the ability to use 3D not only for design purposes but for presentation. Reaching and acceptable level of Image realism (enough to look professional with a client or to not let your professor make fun of you) takes some time. The most challenging part is to be able to stick to one rendering program/plugin and develop your skills fully.
In many years I've got into 3D MAX, V-Ray, Maxwell, Cinema 4D, Rhino... I have to say that for the easy of use so far Maxwell Render has proven to be the easiest to use (although render times sometimes skyrocket when using Multilight).
Many have followed this road before, and some have been extremely successful in getting the most of the process, reaching levels of excellence with Computer Graphics Software that allowed them to jump to other fields thanks to that.
I was reading in CGArchitect an Interview with Tino Schädler, who starting with an Architect background made it to the Film industry after becoming truly proficient with Maya.
Thanks to Tino, i got to discover some CG Artists who have done great jobs lately. Like Joseph Kosinski. For most of us involved in Architecture Software and struggling to work smarter, it seems a very long shot to ever reach similar levels, but as the end of this post I thought it would be nice to dream a bit.
Those levels of imagery require of course full time dedication, super powerful computers and time, but as read in Tino's Interview, improving those skills (even if it doesn't mean that you will turn into a CG Artist) can only help you on your daily struggle for better designs, better buildings (and better pay).
Show me more...
Labels:
General
AutoCAD: Things that SHIFT can do for you
Do you know that the SHIFT Key can make your life much simpler?
Català - Castellano - Deutsch
After many months finding tips about how to work smarter and easier, I realized that some Keys in the keyboard really make a difference on your work speed. That is the reason why I want to start a series of posts explaining what some of these keys can do for you, to improve the way you work.
We will start with the SHIFT Key, since it is the one that so far has proven to me more useful. This is a quick list of how SHIFT will make you work faster with AutoCAD:
Show me more...
Català - Castellano - Deutsch
After many months finding tips about how to work smarter and easier, I realized that some Keys in the keyboard really make a difference on your work speed. That is the reason why I want to start a series of posts explaining what some of these keys can do for you, to improve the way you work.
We will start with the SHIFT Key, since it is the one that so far has proven to me more useful. This is a quick list of how SHIFT will make you work faster with AutoCAD:
- SHIFT while drawing a line will lock the perpendicular inference. It is like a temporary activation of the ORTHO mode. If you press SHIFT, a tooltip with similar to the macro Icon of digital cameras appear to show you that ORTHO mode is temporary active.
- When using FILLET or CHAMFER, pressing SHIFT while selecting the second entity will override the fillet radius or the chamfer distances with a value of 0. Very useful if you want to keep certain radius or chamfer distance but once in a while you need a sharp corner.
- When Selecting Grips of an object, holding SHIFT will allow us to select multiple grips (deeply explained here).
- When we are selecting objects, pressing SHIFT will allow us to deselect any of them.
- When using TRIM or EXTEND, pressing SHIFT will toggle between one command and the other (i.e. if you typed TRIM and press SHIFT and select the object, it will extend instead of trim).
- For object snap tracking, object points are automatically acquired. If you press SHIFT you will avoid acquiring points for object snap tracking.
- SHIFT + SPACEBAR: cycle through selection peviews If selection preview is turned on, you can cycle through the objects by rolling over the object on top to highlight it, and pressing and holding SHIFT and then pressing SPACEBAR continuously. When the required object is highlighted, left-click to select it. If selection preview is turned off, hold down SHIFT + SPACEBAR and click to cycle through these objects, one after the other, until the one you want is selected. Press ESC to turn off cycling.
- SHIFT + RIGHT MOUSE CLICK: Will call the Osnap contextual menu (see more here).
- SHIFT + TAB: When working with Dynamic dimensions, it cycles backward through all editable dimensions (TAB only will cycle forward)
- On AutoCAD Architecture, when we draw Walls, SHIFT allows us to choose the Justification Line. Once we started drawind the wall, by prssing SHIFT we will cycle throught the different possibilities (left, center or right)
Show me more...
Labels:
AutoCAD,
AutoCAD Arch,
Keyboard
Subscribe to:
Posts (Atom)