SketchUp: Modelling a Terrain #01

What are the steps to follow to model a terrain in SketchUp? See them following this series of posts.
Català - Castellano - Deutsch
The first thing we need to do to be able to model a terrain, is to have clean topographic lines. This task is definitely better done on a CAD drafting platform such as AutoCAD.
Ideally, we want to have topo-lines all connected, without gaps in them, and of course we want each of this topo lines to be at the right height. Getting this clean geometry is probably the most time consuming proces of modelling the terrain. See below for a "before and after" version of a typical topo file.
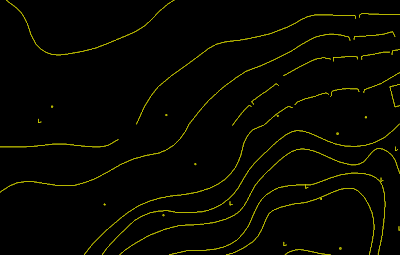
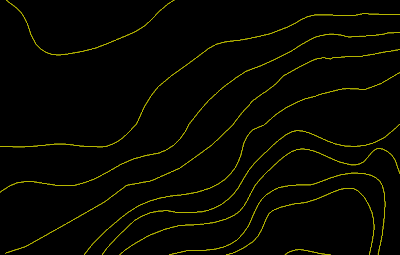

Once we have it, we just need to import the geometry to Sketchup and we are ready to start. To model the terrain, we need the SandBox tools. Although they come standard with sketchup, they need to be activated, so if you can´t see them, go to Windows --> Preferences --> Check that the box of the SandBox is Active --> Then go to View --> Toolbars --> Sandbox.

Before we proceed to use the sandbox tool to model the terrain, I strongly encourage you to use the Simplify Contours Plugin to simplify a bit the topo lines. Otherwise, the resulting terrain might be too heavy to handle.

Once we have done this, we simply need to select topo-lines, and click on the "from contours" tool in the Sandbox toolbar.


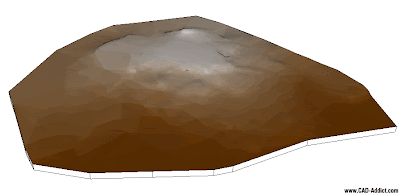
This will create the basic terrain. As you can see on the image below.
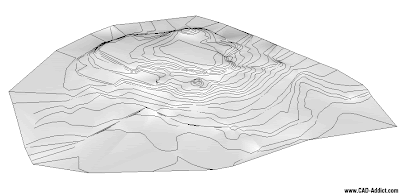

To represent it resembling a real life model I also added the sides and to be able to understand better how the terrain works, I used Chris Fullmer's "color by Z" plugin to paint the terrain. See below.


On future posts we will see how to add simple roads, how to place buildings, how to add vegetation, context terrain from Google earth, etc. I´ll try to use this same model for the other tutorials so anyone can follow them by downloading the file.
BTW, tomorrow is thanksgiving, so those who celebrate it, have a wonderful time with your families and/or friends. Don't get too crazy with the shopping deals...we are still on recession.

Show me more...

AutoCAD: List of Objects

The list of all the AutoCAD object types. Links to the different categories of objects and relevant posts about them.
Català - Castellano - Deutsch
Back in September I started the series "AutoCAD list of Objects". As the series is finished right now, I thought i would be good to have a main post that works as a directory for all of the posts of the series. So here are the links to all those posts.
Remember that you can access this typo of posts that work as a directory of the website by clicking on the "directory" link on the orange navigation bar on the header.

If you find any missing objects, please don't hesitate to contact me and I'll add them on the right category. Thanks!!


Show me more...

AutoCAD: Updating Fields Automatically

A system variable controls how fields are updated, play with it if you are having trouble.
Català - Castellano - Deutsch
My post about using fields in dynamic blocks has aroused some comments (mostly on the spanish version of the post) about the fact that the field of the sample block does not update automatically. I set myself to find why was that and if there was a solution.
This is the block I am talking about.The idea is that when you stretch the dynamic block, the field that shows its width should stretch too. Unfortunately this seems to not be possible, as fields require at least a "REGEN" to be updated. The research let me to discover the FIELDEVAL system variable, that actually controls how fields are updated. This are the options on setting the value of this system variable:
  • 0: Not updated
  • 1: Updated on open
  • 2: Updated on save
  • 4: Updated on plot
  • 8: Updated on use of ETRANSMIT
  • 16: Updated on regeneration
At least I didn't waste my time completely...and you get to learn something new too.

Show me more...

SketchUp Plugin: Geometric Curve Smoothing

Another free form editing plugin for SketchUp. Who said sketchup could only handle boxy geometry??
Català - Castellano - Deutsch
Editing curves and so called free form geometry is something important when we want to design buildings that are something more than a set of boxy shapes. Slowly, the ruby programmers are coming with more and more plugins to do this, turning SketchUp slowly into a great tool, too, for free form modelling.
The latest one I came across with, is the Geometric Curve Smoothing. What it does is better explained on the video below.


The plugin is still under development (currently version 1.1 is out). You can download this version via the author's page.


Show me more...

SketchUp Plugins: Smart Push Pull

Push faces smartly with this plugin from a4chitect.
Català - Castellano - Deutsch
The standard push pull tool doesn't give us sometimes the results we want when the geometry we have is not formed by perpendicular faces. If we have oblique adjacent faces to the one we want to push/pull. Let's see an example of what I mean. On the following model, we want to push the face colored in orange.


The standard Push Pull tool only considers the selected face, regardless of what type of geometry is adjacent to that face. The result would be something like this.


But if what we want is that the push operation understands that there is an oblique face "touching" the face we are pushing, we need to use the SmartPushPull plugin created by a4chitect. This plugin will allow us to get the following result without the need of complicated cleanups.


The plugin is still under development, so I'll just post the link to the Sketchucation thread where you will be able to download it and get the newest versions as soon as they are published.
One of the things you will notice is that the current version v0.26 does not delete the original face and lines, but this can be partially solved by using the "delete coplanar edges" plugin, that we saw on a previous post at CAD-Addict.


Show me more...

Powerpoint: Batch Importing Images

How do you import at once a set of images into PowerPoint?
Català - Castellano - Deutsch
I have never talked about PowerPoint here in CAD-Addict because it always feels it is a bit off topic. But the truth is that PowerPoint (or any similar version like its pen source counterpart - OpenOffice's Impress) is an important tool involved on the CAD work-flow, as the final tool used to present most of what we've done with other programs. So expect once in a while to find some posts about it from now on, specially now that at school I am using it more and more for my presentations.
Today, just want to describe an easy way to batch insert images in Powerpoint. This is useful to create simple presentations. Once we have created our presentation sheets, we might want to import them into PowerPoint at once.
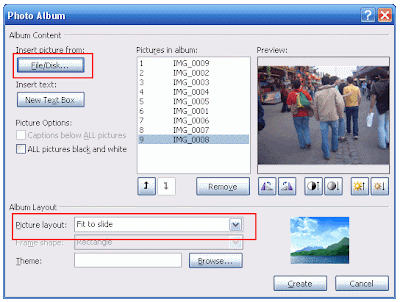
To do this, you simply need to go to the insert tab (Office 2007) and click on Photo Album. Click on "select picture from File/Disk" to search for the folder were you have stored your presentation drawings and simply select the ones you want to include in your presentation. See the dialog box you will be dealing with below.


You can choose the layout you want for the inserted images, normally, fit to slide is for the use of doing a presentation of drawings the most adequate, but you could play with the other options in case you need it.

Show me more...