Català - Castellano - Deutsch
I was very excited about the new Create Parts feature for Revit 2012. I thought it would simplify a lot the process of extracting quantities from a Revit model, by allowing to play with the different layers of a wall or floor (as other BIM packages like Allplan allow). yesterday I gave you the link to the video explaining the features.
My disappointment came today, when I realized that whatever you modify using the Create Parts feature, doesn't get reflected in a default Material Take Off Schedule. My first thought was the following:
"I tried it, it simply doesn't do anything. So as far as i understand it, the Create Parts feature is just a tool for representation. This to me is the wrong approach to go Autodesk. Revit (and BIM) is not just for representation, if you can't get accurate Quantity Take-Offs and thus accurate estimates from a model, what is the point of BIM?"But then I thought, this can't be it, such a cool feature can't end on a mere representation of parts. So I dug deeper and found that you can use it for Quantity Take-Off.

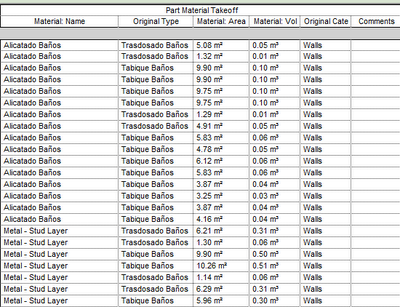
The key is that you need to create a Material Take-Off specific to list the parts, and you do it like this:
- Click View tab > Create panel > Schedule > Schedule/Quantities. Under Category, select “Part”
- Then add the categories you need for your take off, like Material: Name, Material: Area, Material: Volume, etc
I am starting to realize as I read on this post, that REVIT CAN DO EVERYTUIN. Well not yet, but it is getting there, and this post and my chain OF thoughts should serve as an example of how sometimes we blame the Software (and the SOftware designers) for our own lack of expertise with it.
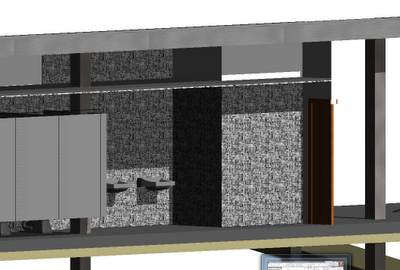
There is just one little BUT I haven't been able to solve. Using Parts combined with Groups doesn't seem to work well. After I created my Bathroom (the one on the first picture) I needed to copy that group all over the buidling since it repeats many times. When I used "Create Similar", the newly create Group, has all the parts reset to default. If you copy the group directly, it does work better, but in my example, some of the parts got reset as well to default.
Need to find out about this point if it is my fault or Revit's fault. So far it seems to be Revit's fault, since I am allowed to modify parts of elements that are inside groups without entering the edit gropu mode, and those changes are not reflected to other instances of the group. A little bug, hopefully it will be solved on Revit 2013.

BTW, I found the solution again via RevitWikiHelp, awesome database of solutions.
Tweet


How do you "undo" create parts? For example... I did the create parts which splits the wall components, but then when I select the wall (or a component of the wall) you can't then "Edit Type" to edit the properties of that wall type. WTF... any way to reverse it?
ReplyDeleteAlso, how the heck do you get walls to wrap when you go into Edit Type->structure (edit) -> an the "wraps" boxes are gray and uneditable. Some of my walls are wraping the drywall, and some won't. Any ideas?
benjamin, you have the option to see or not to see the parts. On the view properties you can chooses show parts, don't show parts or show both. If you choose not to show parts it will show the wall as a single element.
ReplyDeleteBe aware though that if you midify the wall once you edited the parts it might reset the parts to the initial status (i.e all same height and length
Hope this helps