 How do you create a personailised template and store it for future use in MS Project?
Català - Castellano - Deutsch
Creating a Microsoft Project template allows you to save a project plan with pre-defined settings and tasks, so that you can use it as a starting point for future projects. Here is a step-by-step guide on how to create a template and save it in the personal templates folder for future use:
- Open Microsoft Project and create a new project plan.
- Add the tasks and milestones that you want to include in your template. You can also customize the format and layout to your liking.
- Set the project calendar, working time, and other settings that you want to be included in the template.
- Once you have completed your project plan, go to the "File" menu and select "Save As."
- In the Save As dialog box, select "Project Template" from the "Save as type" drop-down menu.
- Choose a location to save the template, such as the "My Templates" folder. You can also create a new folder for your templates if you prefer.
- Give your template a name and click "Save."
- You can now find the template in the "My Templates" folder and use it as a starting point for future projects.
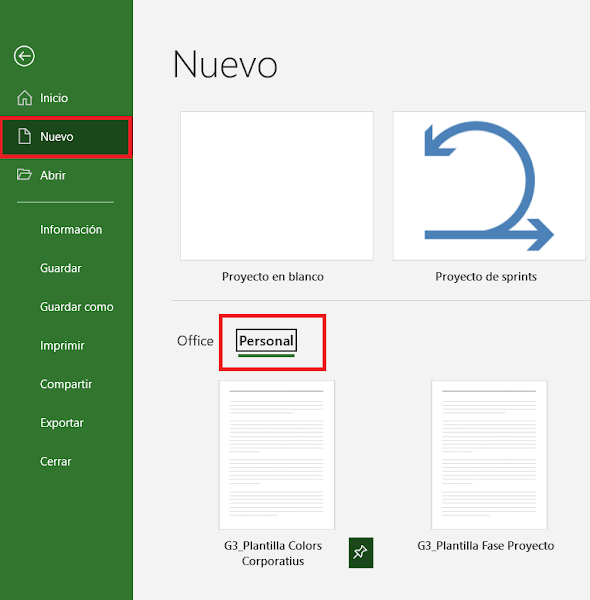
Once you have done this, once you crate a new Project you will be able to select the template from the default Office templates folder or from you personal folder. Like this below (from the spanig version I am currently using)
In addition, you can also share the templates with other team members by saving them to a shared network location, such as a shared drive or a cloud storage service. This allows team members to access the templates from any location and makes it easy to collaborate on project planning. Overall, creating a template in Microsoft Project can save you a lot of time and effort when planning new projects. It allows you to quickly set up a project plan with the tasks, milestones, and settings that you need, and you can easily share the template with other team members.
Tweet


No comments:
Post a Comment