Showing posts with label Tutorials. Show all posts

Revit Architecture 2011: Mass Floors – Floor Area and Volume Calculations – Place Floor, Wall, Curtain System and Roof by Face

A tutorial on using Divide Surface, Surface Patterns and Adaptive Elements on Revit Architecture 2011.
Català - Castellano - Deutsch
Fifth of the series of videos from Autodesk Student Expert group from TU Graz about Revit Architecture 2011.

This one is about using Mass Floors – Floor Area and Volume Calculations – Place Floor, Wall, Curtain System and Roof by Face. See below.


This is the last video on this series about massing from TU Graz. There are some more videos on creating walkthroughs and renderings. I'll post them here too.

via j.a.va.ro


Show me more...

Revit Architecture 2011: Creating Curtain Panels from Patterns

A tutorial on creating curtain wall panels from patterns.
Català - Castellano - Deutsch
Number 6 and 7 of the series of videos from Autodesk Student Expert group from TU Graz about Revit Architecture 2011.

These ones are about creating curtain wall panels from patterns. See the first video below.


And the next one here


One last video to come about massing, I will soon post also the videos about rendering, stay tunned!

via j.a.va.ro


Show me more...

Revit Architecture 2011: Divide Surface, Surface Patterns and Adaptive Elements

A tutorial on using Divide Surface, Surface Patterns and Adaptive Elements on Revit Architecture 2011.
Català - Castellano - Deutsch
Fifth of the series of videos from Autodesk Student Expert group from TU Graz about Revit Architecture 2011.

This one is about using Divide Surface, Surface Patterns and Adaptive Elements. See below.


More to come, stay tunned!

BTW! Happy Holidays or Merry Christmas or whatever you prefer.

via j.a.va.ro


Show me more...

Revit Architecture 2011: Swept Blend Mass – Dissolve Mass – Spline Through Points

A tutorial on using wept Blend Mass,Dissolve Mass and Spline Through Points on Revit Architecture 2011.
Català - Castellano - Deutsch
Fourth of the series of videos from Autodesk Student Expert group from TU Graz about Revit Architecture 2011.

This one is about creating Swept Blend Mass, Dissolve Mass and Spline Through Points. See below.


More to come, stay tunned!

via j.a.va.ro


Show me more...

Revit Architecture 2011: Reference Lines, Freeform Surface and Revolve Mass Tutorial

A tutorial on Reference Lines , freeform suraces and revolve mass on Revit.
Català - Castellano - Deutsch
Third of the series of videos from Autodesk Student Expert group from TU Graz about Revit Architecture 2011.

This one is about creating Reference Lines , freeform suraces and revolve mass. See below.


More to come, stay tunned!

via j.a.va.ro


Show me more...

Revit Architecture: How to Create Custom Stairs

A Tutorial Video from Autodesk University about creating custom stairs
Català - Castellano - Deutsch
Was trying to create a custom stair for the prject I am working on with Revit and needed some help. I found this Lecture from Autodesk university 2009; it explains quite well all you need to know about the different elements and parameters to deal with when modeling stairs. Below is a screenshot of the presentation, click on it to access the video tutorial.


Cheers

Show me more...

Revit Architecture 2011: Conceptual Mass and Blend Mass Tutorial

A tutorial on using massing tools and voids for creating quick site content and more.
Català - Castellano - Deutsch
Second of the series of videos from Autodesk Student Expert about Revit Architecture 2011.

This one is about creating Conceptual Mass and how to add it to the model . See below.


More to come, stay tunned!

via j.a.va.ro


Show me more...

Revit Architecture 2011: Using Extrusion, Workplane and Voids

A Video Tutorial on how to creat mass elements in Revit for conceptual studies.A tutorial on using massing tools and voids for creating quick site content and more.
Català - Castellano - Deutsch
This is the first of a series of videos from Autodesk Student Expert about Revit Architecture 2011. They are about massing tools

This one is about creating a mass element and using the extrusion tools and how to add it to the model and place it using the work plane . See below.


More to come, stay tunned!

via j.a.va.ro


Show me more...

SketchUp to Maxwell Beginner Tutorials

A set of tutorials to learn how to create photorealistic images in Maxwell from Sketchup.
Català - Castellano - Deutsch
I've been praising how good it is to use Maxwell Render to create photorealistic images. Aidan Chopra posted a link to the tutorials website where you can find an entire set of tutorials to learn how to work from SketchUp to Maxwell to create this images. The tutorials are listed below.

via Official Google SketchUp Blog.

Show me more...

Learning to Use Adobe Products

Adobe has a grat video Library to learn to use their products
Català - Castellano
I started updating my portfolio this weekend (with the current state of the Architecture Industry you never know when you will need to have it ready) and I wanted to use Adobe InDesign because I had read is the best software for composing great looking professional layouts.
My knowledge on this software is so far very limited so I wanted to learn from tutorials or whatever resources are available. Looking through the help files, I found a link to video tutorials.
The best thing of this finding is that the video tutorials are not limited to InDesign, but to all the products Adobe has in its Portfolio. I followed 8 of the videos about InDesign and I can say they are very easy to follow and each one concentrates on one topic. I think it is a great resource to learn some basics and some advanced tricks so I´ll be using this on the next months. Anything that I find worth mentioning will of course be posted here.
Hopefully if I get good enough on using InDesign, I might even start a new category dedicated to this program. Architects don´t generally use InDesign (at least no company where I've been ever had it installed) but I believe it is a great tool.

Show me more...

AutoCAD tutorial: Creating a dynamic block 1.0

Learn step by step how to create a dynamic block.
Català - Castellano
Dynamic blocks are a very important resource to increase productivity. What would require several different blocks can be achieved with a single dynamic one if we know how to give the right editing properties to them.
In this first tutorial we will create a dynamic block for an escalator. The block will be able to be stretched to have different step widths, overall lengths (to cover different floor to floor heights) and some other cool properties.
First of all we have to create a standard block. I got the escalator DWG from Schindler, the block is good enough for the precise height you request it. This is the drawing we will start with.
We will name this block Dynamic Escalator. To make this block a dynamic block we have to add Parameters and Actions to the block. To do so, select the blog and type BE (Block Editor). Inside the Block Editor you will find a series of buttons that will allow you to do that.

We have to plan what we want to do, and probably you will have to do things twice or trice till you make the block work as you want. To start we will set the parameters and actions that will let us modify the step width of the escalator. This are the steps we will follow.
  • Click the parameter button
  • Select Linear as Parameter Type.
  • Select the two edges of one of the steps.
  • Choose to show only one grip.
This is how the parameter should look after we created it.

Now, we need to add an action to this parameter. This are the steps to follow.
  • Click the Action Button
  • Select the Parameter
  • Choose Stretch As the Action Type
  • Select the Grip
  • Select the stretch Polygon (like you would select the objects using the STRETCH command)
  • Select the objects to be stretched.
The block should resemble to this:
Try to save and go out of the block editor. Check that the block behaves the way it is expected. If it does we will continue adding parameters and actions.
Next we will make the block stretchable in length. This will require more than one action since we not only want to stretch the lines, but also make extra steps appear when we stretch the block.
We will do the following:
  • Add a linear parameter to the length of the block
  • Add a stretch action to stretch all the lateral lines of the escalator.
  • Add an Array action to make new steps when the block is edited.
The first think we will have to do is to erase all the step lines except one so we can use the array action properly. With that done, we add a linear parameter to the length of the block. See that I also added some markers on a non plot layer so I know certain points where the length of the escalator corresponds to certain floor to floor height (like 5m, 6m, 7m etc.). The block should look something like this at this point (inside the Block Editor Interface):


We want the step lines to show all the way from end to end of the escalator. We need to add an array action to the same linear parameter that we are using for stretching the block in length. We follow these process:
  • Click the action Button
  • Select the linear parameter.
  • Choose Array as the action
  • Select the single step line we have when prompted to select objects
It is important that the linear parameter starts on the step line and ends where the steps are supposed to disappear, otherwise you might get step lines out of the boundaries they are supposed to be. Again, save the block and go out of the block editor interface. Check that the parameters and actions added work as desired.
We still want to add a couple more parameters to the block. First we want text and an arrow that shows if the escalator is going down or arriving from the level below. We will use the text DN for going down, and AR for an escalator that arrives to the level we are showing. First we prepare the block for the actions we want to add.
  • We type both texts AR and DN on the same exact position.
  • We mirror the arrow head so we have a line with arrows on both sides.
It should look like the image above. What we want to do is to be able to use the same block either for an elevator going down (DN text with the arrow pointing away form the text) and an elevator arriving to the level we are showing (AR text with the arrow pointing to it). We will have to use a different parameter type called Visibility. It is important to know the buttons related to the visibility parameter. They are situated on the upper right corner of the block editor interface. They are the following.

  1. Toggles objects on other visibility states on and off.
  2. Makes an object visible in the current visibility state
  3. Hides an object form the current visibility state
  4. Calls the visibility states dialog box (where we will create different visibility states)
So the steps we will follow are:
  • first we have to do is click button #4 and create a new visibility state called AR, and rename the existing one as DN.
  • Having DN as active visibility state select the AR text and the arrowhead pointing to it and click button #3 to hide them. (the objects will diappear if you didn't click button #1, if you did the objects will be faded)
  • Turn AR visibility state active, select DN text and arrowhead pointing away from it and hide them (button #3)
Let's check if it worked. Save the block and get out of the BE interface. Select the block and click on the grip corresponding to the visibility parameter. You'll be able to select the visibility mode you want so with the same block you will be able to show both an escalator going down and another arriving to the level we are. See the too pictures below.

The last edit I added to the block is a rotation aprameter and action that allows me to rotate the text to any position I want. The idea is that no matter in which angle the escalator is placed, the text should always be facing the right way. See the image below to understand what I mean..
I am not going to detail the steps for this since it is pretty simple and similar to the rest of the process. Just think of using a rotation parameter and action applied to the center of the text.
If you want to check the escalator file, you can download it here.

Show me more...

AutoCAD: Creating New Palette Group

Organize your blocks on a custom made tool palette.. We might want to create a new Tool Palette Group, let´s say to store all our blocks. The default groups in AutoCAD Architecture 2008 are Design, Document, Detailing and Visualization.
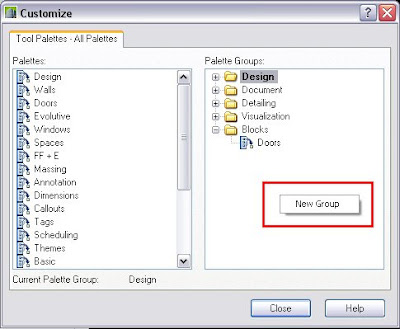
Lets assume that we want to create a new palette group for all the blocks we have.We have to right click on the lower corner of the tool palettes bar and select "Customize Palettes". We will get the following screen.
On the righ portion of the window we right click on a blank portion of the screen and we select "New group". We will name the new group "Blocks". Now to be able to see the new group it needs to have at least one palette. We can drag one palette from one of the default groups to our custom created one.
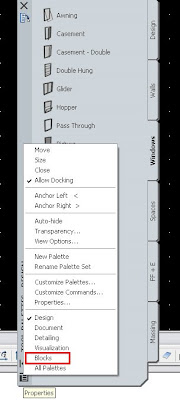
We click close and right click again the bottom corner of the tool palettes bar. A new line with the name of our group will appear.
Once in the new group we can add as many palettes as we want to it, and drag and drop the blocks to them so they can be easily accessed from any file.
Once we have created our grup and configured our palettes we might want to transfer them to other computers. See this post to know how to do that.


Show me more...

AutoCAD: Transferring Tool Palettes

Transfer your tool palettes from one computer to another.
Català - Castellano
After creating tool palettes in any of the AutoCAD versions, you might want to transfer them to other computers in your network. There is no Export command so finding the way to do so it might be a bit complicated.
Here is a link to the support site from autodesk about the topic. Basically it explains the following steps to do that. You have to use the content browser. But the explanation from autodesk I think is a bit short and might not be enough fo a newby. So here comes a kind of extended version of it.
To store the palettes you have created do the following:
  • Click on the content browser icon or type CONTENTBROWSER in the command line window.
  • Right click and "Add Catalog" --> Create New Catalog
  • Browse to a network location that all computers can access.
  • Save the catalog there.
  • Double click the new catalog that you have created.
  • Drag and drop the new palettes to from you palettes side bar to the Catalog.
In any computer where you want to add those palettes, follow these steps
  • CONTENTBROWSER
  • Add catalog --> Add an existing Catalog
  • Browse t the network location you specified before
  • Double click the new added catalog
  • Drag and drop the palettes you want from the catalog to your tool palettes bar. (see that it is not a simple drag and drop operation, you have to click in the palette you want to load in the contend browser and keep pressing the mouse button till a syringe icon loads, then drag to the tool palettes bar in AutoCAD
Note: After the initial transfer operation, you can add new tool palettes that you created by drag and dropping them to the Catalog in Content Browser. That will make any palette you created in one computer available to the other users on your network.
kick it on CadKicks.com

Show me more...