SketchUp: Adding camera control to the Web Exporter

I found a way to control the camera location when using the SketchUp Web Exporter Plugin. A bit rudimentary, but it works.
Català - Castellano
Some months ago we talked about the SketchUp Web Exporter that had been by then released by Google. The biggest flaw I found to that beta release was the lack of control over the camera position.
I've been waiting for a while to see some improvements on that Plugin, but since nothing happened since then i decided to try something I had in mind. As you will can read in the post about the plugin, what this does, is basically create an HTML file plus a set of images. Then I thought, what if we change the images?
This is the basic procedure I used to create the quick fly through that you can see below these lines.

What I did was basically to use the web exporter to export a set of images and the HTML file. Then, I configured the fly Path I wanted and exported the animation as still JPEG images. The next step was simply replace the images generated by the web exporter, for those saved when i exported the animation. There are some issues matching the number of frames, but the result is not too bad.
One more issue I found when using the Web Exporter is that the resulting Java Script is not very smooth to use, you will see when you drag over it that sometimes it gets locked or jumps to a different camera position for no reason. Well there are reasons, is the way the Script is created. Besides, since the path is not a loop, it is giving some problems, i am working on trying to find a better way to make it smoother.
Anyways, since my Ruby programming knowledge is so far 0/10, I just call for someone to try to melt this two processes in a script that can easily do what I did here without all the hassle of exporting twice and overwriting images. Let's see if I am lucky.

Show me more...

AutoCAD: Switch Text Between Uppercase and Lowercase

Did you forget the Caps Lock on while typing a long text in AutoCAD? Don't delete it, do this.
Català - Castellano
Some people type texts staring at the keyboard instead of at the screen. That together with the fact that sometimes we forget the Caps Lock on, means that we end up deleting and retyping some texts. No need to retype anymore.
If we select the text we want to turn from uppercase to lowercase and press together CTRL + SHIFT + L, it will automatically become lowercase.
The system works too on the other way. If we press CTRL + SHIFT + U, the selected text will turn to uppercase.

Show me more...

SketchUp Plugins: Windowizer

Do not manually model windows, there is a plugin that can do that for you in a second.
Català - Castellano - Deutsch
I didn't write about this SketchUp Plugin before because I discovered it way before I started blogging. Nevertheless it is a time saving Plugin that deserves to be introduced to those who don't know it.
The Windowizer.rb Plugin as its names states, helps you create windows. As you will learn after you get used to the plugin, many other types of objects can be created using the Plugin.
The methodology is very simple. After installing the Plugin, select a quadrilateral face, right click on it and you will see that the option Windowizer appears in the right click menu. See the image.
After clicking on Windowize, we will get a Dialog Box where we can introduce the different properties of the window we want to create. Something like this:
By default, the Plugin already selects certain properties, like having DimGray as the material for the frame and BlueGlass as the material for the Glass parts. If we select to have a window with 3 rows and 3 columns, the results would be something like this.
You can set the properties to fit with your design needs. If after you create the window you are not satisfied with the results, right click on it and you will be able to modify it or erase it.
You can use it in any quadrilateral face with only 4 edges, be sure your geometry is clean and that you don't have any broken lines or the Plugin will not work.The edges don't need to be parallel to each other. See this example created with windowizer and non regular quadrilateral faces.
The Author of this Plugin is Rick Wilson, you can Download version 3.0 here for free or purchase version 4 here. See that this post uses the version 3.05. I haven't tried version 4 yet but will write about it when I do.

Show me more...

AutoCAD: Things that CTRL can do for you

Following the series that explores the benefits of certain keys. This time CTRL will make your life easier.
Català - Castellano
Second post on the series "things that a KEY can do for you". The first one was about the SHIFT key. In this one we will see how CTRL can help us work faster. Several processes can be sped up using the CTRL key smartly:
  • If we click on a Grip of an object we can move it, stretch it, etc. If we press CTRL we will copy it.
  • Pressing CTRL on AutoCAD Architecture (ACA) when we are drawing a wall, will toggle the justification line from left to right.
  • Also on ACA, when moving a grip of an AEC polygon, pressing CTRL will cycle through the different options. (see this post for more details)
  • On 3D objects, pressing CTRL will allow us to select subobjects (i.e faces)
  • On 3D objects, if we are editing faces through Grips, CTRL will togle between the different editing methods.
There are other functions CTRL performs in AutoCAD or ACA, but these are the ones I find the most useful to increase your work speed. If you know of any other, let me know!

Show me more...

AutoCAD: Fields in Dynamic Blocks to Display Properties

If you need to display certain changing properties of a dynamic block you can do it using Attributes and Fields
Català - Castellano
In a previous post, I went through the process of creating a dynamic block of an escalator with dynamic properties. The block allowed its length and width to be modified using parameters and actions. We will use that block as a reference to explain how to add a dynamic attribute.
We will attempt, as an example, to add a text that will show us the width of the steps in the escalator block. To make things simpler, you can download the block here. We will follow these steps:
  • Enter the Block Editor mode (type BE)
  • Define an attribute (ATTDEF)
  • Insert a field on that attribute
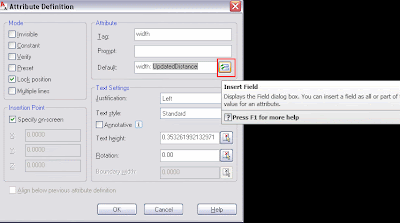
Once we are in Block Editor Mode and we type ATTDEF we will get the Attribute Definition dialog Box. Here we can tag the Attribute as Width. For its default value we will ad "Width: " and after that is where we will insert the field. To insert the field we will click on the Box near the Default value Box. See the picture below.

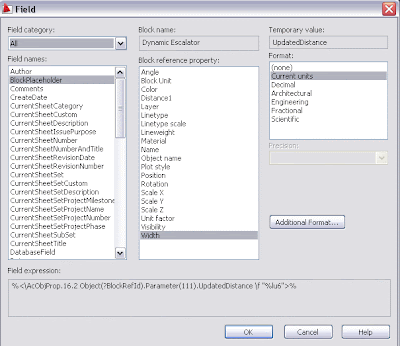
The type of field we need to add is a "Block Place Holder". We will see all the parameters of a dynamic block listed here, plus other properties such as layer, color, etc. In this case I renamed the parameter "Distance" as "Width". So I select this one.

One extra step that helps in the process is to select the attribute to be constant (so we don't get a prompt asking its value).
Update: Make sure that the attribute is NOT set to constant, otherwise it will not update when beeing modified.
Wen we finish defining the attribute we simply exit the Block editor mode and insert a new instance of the block. The new defined attribute will appear, and if we change the width of the steps (and REGEN the drawing) the field will update with the new distance.

You can download the same block with the dynamic attribute here to see it for yourself.kick it on CadKicks.com

Show me more...

Happy New Year to All CAD Addicts

The Year comes to an end with big doubts on the Architecture Industry but with hope of a Better 2009.
Català - Castellano
Just wanted to wish a Happy New Year to all CAD Addict users who joint this community during 2008, and hope for a better 2009 to everyone in the Architecture Industry. Hopefully by the end of Next year things could be a bit better and less layoffs and company closing will be happening.
Although many forecasts are very pessimistic about the evolution of the economy next year do not forget that if you make yourself indispensable wherever you work you will have a change to overcome the crisis.
As a New Year wish I intend to get even more serious into this blog, put as much time an effort as I can, try to improve both the design and the contents of this site and hopefully reach a wider audience.
Remember that you can stay update Subscribing to the blog updates in a reader or entering your email address in the box found on the upper right corner of this website.

Show me more...

SketchUp: Import and Export Scenes

Did you know that you can import and export the Scenes from one file to another? It is (not) a default option in SketchUp.
Català - Castellano
Saving Scenes is an important step on the design process. As the design evolves, it is a good option to show the same view of several options to easily compare them. Trying to mimic a view manually can be quite time consuming. We can of course open a drawing that has the view we want, erase everything in it, and paste in place the new model.
But there is a better way to get views from one file to another. SketchUp has an option to Import and Export Scenes (Pages).
Update: I was using my office computer and I thought this was a default option but it seems that it is not, you need the PageExIm.rb Plugin by Rick Wilson. It costs $5 and can be found here. Anything else in the post is still valid once you have this Plugin.
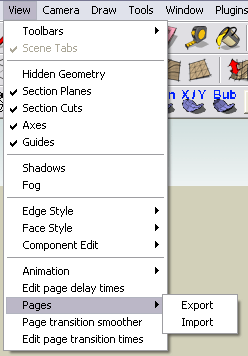
You just need to go to View --> Pages --> Export. You will save a file with the extension .SUP (for SketchUp Pages I guess). Form another file you can easily import those views by going to View --> Pages --> Import, and selecting the previously saved file.
Remember that to be able to use the views saved both models have to be placed in the same location.

Show me more...

SketchUp: Export to Maxwell Problems

If you can't find the Maxwell type of file when trying to export from SketchUp you might find the solution here.
Català - Castellano
For some reason, me and some other colleagues have been experiencing problems to Export to Maxwell from SketchUp. We followed all the steps to install the Maxwell Export Plugin for SketchUp but for some reason the .MXS type of file didn't appear as a file type in the Export Dialog Box.
For some reason the installation of the plugin didn't work 100%. I got in touch with Next limit Tech Support (that I have to say has a phenomenal response time) an they told me how to solve it. Apparently, the installation of the plugin was lacking one file. The solution is copying the mfc71.dll file from SketchUp installation folder to C:\Windows\System32. That solved the issue.
I haven't figured out if the problem comes from an issue on the plugin setup file, or some problem with our computers, but the solution worked. If you are having a similar problem try this, but first be sure that you check if the .MXS type of file is there or not. It happens to be on top of the list in the export dialog box, so sometimes people think that is not there when the only thing they need is to scroll up on the file type list.

Show me more...

AutoCAD: Missing "Open", "New" and "Save As" Dialog Boxes

What happened to the Save As Dialog Box? How do you get it to appear again if it is missing?
Català - Castellano
More solutions found thanks to colleagues asking me questions. Today Alejandro asked me if I knew how come he couldn't see the "Save As" dialog Box. First thought was that since he got AutoCAD recently installed all the Dialog Boxes might be out of the screen area.
But that wasn't the problem. A bit more of research allowed me to find out that the tricky System Variable causing trouble there was FILEDIA.
FILEDIA can be set to either "1" or "0" values.
  • If the variable is set to 0, no Dialog Boxes will be shown (i.e. you will have to enter the information you would normally enter through a dialog box directly in the command line).
  • If the variable is set to 1, the Dialog Boxes will be shown normally.
kick it on CadKicks.com

Show me more...

This Christmas Buy Knowledge

Buy some books that will make you work smarter this holiday season.
Someone said once that a smart person is that one that invests more money in things that will go inside his head than in things that stay outside. Now is your turn to buy some knowledge for yourself or for anyone you know.
The main CAD programs have several Books that will let you improve the way you work with them. Although books are never as good as practice, practice and practice, they are a good reference to have in hand to learn new features of a program. Here are some of the ones that seemed the best deals for me this end of 2008 for some of the programs you might be trying to

AutoCAD
Beginner - AutoCAD 2009 for Dummies

The "for Dummies" series with its plain language let you learn the basics of almost anything. A great deal for its price (around $16 / £10). Sometimes as I often write ere we overlook the basics of programs missing some fundamental tricks to work smarter. here you´ll find a lot.

or

Expert - AutoCAD 2009 Bible:

The Bible by Ellen Filkenstein has been for years a reference Book for those who want to go deep in their AutoCAD Knowlege. Even the latest 2009 version is quite affordable (the book sells for around $30 or £20) and has plenty of knowledgeable tips. All you need to know (besides what you read here) about AutoCAD.

or


SketchUp:
Beginner - SketchUp For Dummies

With about 250 pages to get introduced to all the basic SketchUp features and some more to start using some other intermediate procedures.I think the "for Dummies" series can lack sometimes a bit of seriousness and the language is not always very clear, but in this release they did a pretty good Job.

or

Advanced - SketchUp Advanced Tutorials

Bonnie Roskes publishes her own books. (See a previous posts we talked about the books for kids). This one is the one addressed to the ones who want to know more about this fantastic software. Here I want to stress again that there is no better training than practice. But buying a book doesn´t hurt anyone I guess.


Show me more...

AutoCAD: Full power of the LAYFRZ command

Trouble freezing layers on XREFs or Blocks? The solution is on the command line
Català - Castellano
Many commands in AutoCAD have more options than we really know. We just need to take a look at the command line once the command is active to find these extra options. LAYFRZ is not an exception to this rule.
We often have trouble trying to freeze layers within XREFs or Blocks. THis is because of the hierarchy system of AutoCAD, but also because the LAYFRZ command might be configured wrong.
Once we start the command, we have the chance to type "S" for settings and we will access a world of possibilities. What is basically important to understand is the set of options regarding Block Nesting.


We have b (for Block) that will do 2 different things:
  • If a selected object is nested in a block, freezes the layer of that block.
  • If a selected object is nested in an xref, freezes the layer of the object.
E (for Entity) will freeze the layers of the selected objects even if they are nested.
N (for None) would freeze the layer containing the block or Xref.
I think it is good to remember that with any tool there might be some extra options that we are not considering that we can discover by paying some attention to the command line.

Show me more...

SketchUp: How to Mirror Objects.

There are several ways to mirror objects in SketchUp
Català - Castellano
Mirror is not a standard tool in SketchUp, but that is probably because there are several ways to Mirror objects using other methods. There are to me 3 methods to mirror objects. Two of them can be done with the standard SketchUp installation, the third one (and probably the best) requires a Plugin. Let's see the 3 of them:
  • We can select the object we want to mirror, right click on it and select "Flip Along:" This will give us the chance to select which plane (red, green or blue) of the object to use as a mirror plane. The negative part of this is that yo can't select the mirror plane. The mirror plane has to be one of the planes defined by the center of the object.
  • We can use the Scale Tool. Select one of the grips (using the grips on the center of the faces of the object's bounding box is the best way to go) and type "-1" as the scale value on the Value Control Box (VCB). Again, we can´t control the mirro plane, it has to be one plane defined by the faces of the bounding box of the object.
  • The third method is to use the Mirror.rb Plugin. This plugin is very easy to use and allows us to select the mirror plane and also to choose if we want to keep the original object or delete it after the mirror operation. It is by far the best way to go. To use the plugin (after saving it to your plugins folder) select the object you want to mirror and go to Plugins --> Mirror Selection. Then you will need to pick the 3 points that define the mirror plane, and at the end you will have te option to choose to either keep or erase the source object. Easy and simple, and a time saver.
You can download the plugin directly here, or go to the original thread by the author TIG. Thanks to him for this great plugin.

Show me more...