AutoCAD: Getting Back the old XREF manager

Are you missing the old and simple XREF manager? Don't worry, it is still there.
Català - Castellano
Since version 2007, AutoCAD uses by default the External References Palette instead of the old XREF Manager to handle External References and Images all in one interface.
Although it is useful to have a palette always on to handle XREFs, it is sometimes a big annoying to have all images and XREFs listed. What we do with images and XREFs tend to be pretty different, so it could be good to see only the XREFs listed if we wanted.
If we add that the External Reference Palette tends to be much heavier in terms of computer resources used, we have enough reasons to want to old XREF manager back. That wish is granted just by knowing that the old XREF was never deleted from AUTOCAD (at least till the day and version 2009), and it can be accessed typing CLASSICXREF. See the image below where I have the new External References Palette and the old XREF both showing on the screen.

I have my list of aliases customized so XR points to CLASSICXREF instead of opening the External References Palette. By typing IM (for Image) I still get to access easily the new External References Palette. (note that the old Image Manager can also be accessed using the CLASSICIMAGE command)

kick it on CadKicks.com

Show me more...

Finding Any Possible Vehicle Turning Radius

Do you need to find out if you have enough space for vehicles to turn? There is a pogram to draw any possible turning radius.
Català - Castellano
If you are designing a parking garage and have very narrow turning spaces or if you are trying to fit a service dock in an area where you are not sure if the trucks will be able to manoeuvre a template showing the inner and outer turning radius might not be enough.
What you need is a program that can simulate the trajectories of Cars, Trucks, Buses, etc. And there is one. The awesome piece of software created by Transoft Solutions is called AutoTURN. It is a commercial product with a price that varies depending on the type of license (we inquired at work some months ago and the price given for our type of license was around $250), but if you are into any kind of Site Design, Road Design or anything involving vehicle movement it is worth the price in a single use.
Let me show you a quick snapshot so you can get an idea. Recently we've been trying to figure out if we could fit a Service Dock for 4 SemiTrailers
16.50m long in a pretty tight piece of a project. With AutoTURN we managed to see that we did have enough space making some little adjustments on the project.


The Program works both on AutoCAD and Microstation platforms, it has a very wide range of vehicles for many different countries, works both in metric and imperial unit systems and I insist it is amazing how useful it is. Just imagine the fees you could save on Traffic Consultants...
You can download a Demo Version going to the AutoTURN Website to give it try with only one vehicle type (an articulated Bus).

kick it on CadKicks.com

Show me more...

SketchUp Plugins: The Scale Tool Becomes Smart

Finnally someone made some sense and created a Plugin that allows us to scale the objects properly no matter they orientation
Català - Castellano
Thanks again to Jim and his amazing SketchUp Plugins Blog I came across the video you can see below that shows the very impressive FreeScale.rb Plugin developed by Fredo6.

I think the video speaks for itself, but basically what you should know is that the new Plugin allows you to Scale any object basing the bounding box alignment on any line you have in the drawing. (there is also an amazing Taper tool). This is no doubt one of those Plugins it is hard to believe it is released for free.
You can download the Plugin here and the library needed to run it here or go to the Plugin release thread. One of the most complete, easiest to use and most useful Plugins I've come across. Thanks Fredo.

Show me more...
AutoCAD: Drawing Construction Lines XLINE vs RAY

Two commands allow us to draw infinite length construction lines. Use them wisely
Català - Castellano
AutoCAD has two commands to draw lines of infinite length that can work as construction references for drawings. They are very useful to draw elevations or sections based on a plan. They are both very similar.
  • XLINE: Draws a line of infinite length. We can draw it free or set it to be horizontal, vertical, follow a certain angle, be the bisector of an angle or be parallel to certain line. If we draw the line directly after entering the command, we will draw it freely, if we check the command line, we will find the different options mentioned before.
  • RAY: Is like a simplified version of XLINE. RAY draws an infinite length line, but from a start point (a line wih a beginning but without end). It has no options like the ones availabel for XLINE, simply select a initial point and a second one will define de angle.
I personally tend to use XLINE much more than RAY becaus the diferent options and specially the possibility to lock them to horizontal or vertical makes XLINE ideal for translating dimensions from plans to elevations. Just one advice if you work in amultiuser environment where others wil have your drawigns as XREFs insertd in theirs, try to use this only temporarily, since it is quite annoying when suddenly an XREF that you have inserted suddenly shows a million XLINES.

kick it on CadKicks.com

Show me more...
AutoCAD: Object Smart Selection QSELECT vs FILTER

There are two commands to select objects on a smart way. Each of them has different features.
Català - Castellano
When we have a complicated drawing and need to select some of the objects in it we have two commands that will help us do the selection process easier:
  • QSELECT: Also accessible on the upper right corner of the properties Tab, this command is probably the best known to select only certain objects in the drawing. Once the command is active, its dialog box looks like the image on the right (click the image for a larger version of it). You can select objects by object type, color, layer, plot style, etc. making it quite simple to select several objects at once. You can choose to select all the objects in the drawing that comply with the properties you assign in this dialog box or just those of the current selection. See a quick example of what QSELECT can do. The images below, show a bunch of lines and arcs drawn on different layers. Using QSELCT we selected on the second image only the objects on the layer named "2" that has Yellow as the layer color. On the third image we used QSELECT to select only the Arcs regardless of their layer. You can see how useful this can turn to be.

  • FILTER: The command FILTER is not as widely known as QSELECT, probably because QSELECT has the icon on the properties tab and this one doesn't, and because since the introduction of QSELECT in version 2000, this command seems to be left with no updates. It is though a very useful complement, specially because it allows us to store selection filters. This will turn to be extremely useful in complicated drawings. See below the interface of the FILTER dialog box, and how we filter the objects to only select those Arcs that are on Layer 2 (again click the images if you want to see an enlarged version)

Both commands are very important to speed up the selection of multiple objects. QSELECT has a more intuitive interface, but the capacity of saving selection filters with FILTER makes it also very useful.

kick it on CadKicks.com

Show me more...

SketchUp: Replacing Components

Easily replace instances of a component by another one. Very useful to speed performance on complicated models.
Català - Castellano
Sometimes when using SketchUp we might find a situation when we want to replace a set of instances of a component for instances of another one. Depending on what we are trying to archive, we can confront this problem differently. If we want to replace all instances, we can simply enter the component, erase everything in it and replace it for the new geometry.
But sometimes we might want to replace only some of the instances. Then is when we have to know how to use the Component Browser. We can access it going to Window (SkethUp in Mac) --> Components. Once we are there, the process is pretty simple.
  • We select all the instances of the component (or components) we want to replace.
  • Then we right click the thumbnail of the new component on the Component Browser.
  • A context menu shows and we select "Replace Selected"
The new component will replace the old ones. See the two pictures below to see how I replaced 2 instances of 2 different components for 2 instances of a new component.

One of the great uses of this process is, as I mentioned before, when we have very complicated models. We can use simple components as placeholders of more complicated ones. While designing or building the model we might use the simple components, making it easier and faster to deal with the model. When we are ready and we don't need to move and turn the model so much, we can replace the siple components for the more complicated ones.
As I read in SketchUp for Dummies, you could use a simple 2d tree as placeholder for all the trees in your model and replace them for a detailed 3D tree at the end. This would make your work with the complicated model possible, but still allow you to easily add detail when needed.

Show me more...

SketchUp: Adding camera control to the Web Exporter

I found a way to control the camera location when using the SketchUp Web Exporter Plugin. A bit rudimentary, but it works.
Català - Castellano
Some months ago we talked about the SketchUp Web Exporter that had been by then released by Google. The biggest flaw I found to that beta release was the lack of control over the camera position.
I've been waiting for a while to see some improvements on that Plugin, but since nothing happened since then i decided to try something I had in mind. As you will can read in the post about the plugin, what this does, is basically create an HTML file plus a set of images. Then I thought, what if we change the images?
This is the basic procedure I used to create the quick fly through that you can see below these lines.

What I did was basically to use the web exporter to export a set of images and the HTML file. Then, I configured the fly Path I wanted and exported the animation as still JPEG images. The next step was simply replace the images generated by the web exporter, for those saved when i exported the animation. There are some issues matching the number of frames, but the result is not too bad.
One more issue I found when using the Web Exporter is that the resulting Java Script is not very smooth to use, you will see when you drag over it that sometimes it gets locked or jumps to a different camera position for no reason. Well there are reasons, is the way the Script is created. Besides, since the path is not a loop, it is giving some problems, i am working on trying to find a better way to make it smoother.
Anyways, since my Ruby programming knowledge is so far 0/10, I just call for someone to try to melt this two processes in a script that can easily do what I did here without all the hassle of exporting twice and overwriting images. Let's see if I am lucky.

Show me more...

AutoCAD: Switch Text Between Uppercase and Lowercase

Did you forget the Caps Lock on while typing a long text in AutoCAD? Don't delete it, do this.
Català - Castellano
Some people type texts staring at the keyboard instead of at the screen. That together with the fact that sometimes we forget the Caps Lock on, means that we end up deleting and retyping some texts. No need to retype anymore.
If we select the text we want to turn from uppercase to lowercase and press together CTRL + SHIFT + L, it will automatically become lowercase.
The system works too on the other way. If we press CTRL + SHIFT + U, the selected text will turn to uppercase.

Show me more...

SketchUp Plugins: Windowizer

Do not manually model windows, there is a plugin that can do that for you in a second.
Català - Castellano - Deutsch
I didn't write about this SketchUp Plugin before because I discovered it way before I started blogging. Nevertheless it is a time saving Plugin that deserves to be introduced to those who don't know it.
The Windowizer.rb Plugin as its names states, helps you create windows. As you will learn after you get used to the plugin, many other types of objects can be created using the Plugin.
The methodology is very simple. After installing the Plugin, select a quadrilateral face, right click on it and you will see that the option Windowizer appears in the right click menu. See the image.
After clicking on Windowize, we will get a Dialog Box where we can introduce the different properties of the window we want to create. Something like this:
By default, the Plugin already selects certain properties, like having DimGray as the material for the frame and BlueGlass as the material for the Glass parts. If we select to have a window with 3 rows and 3 columns, the results would be something like this.
You can set the properties to fit with your design needs. If after you create the window you are not satisfied with the results, right click on it and you will be able to modify it or erase it.
You can use it in any quadrilateral face with only 4 edges, be sure your geometry is clean and that you don't have any broken lines or the Plugin will not work.The edges don't need to be parallel to each other. See this example created with windowizer and non regular quadrilateral faces.
The Author of this Plugin is Rick Wilson, you can Download version 3.0 here for free or purchase version 4 here. See that this post uses the version 3.05. I haven't tried version 4 yet but will write about it when I do.

Show me more...

AutoCAD: Things that CTRL can do for you

Following the series that explores the benefits of certain keys. This time CTRL will make your life easier.
Català - Castellano
Second post on the series "things that a KEY can do for you". The first one was about the SHIFT key. In this one we will see how CTRL can help us work faster. Several processes can be sped up using the CTRL key smartly:
  • If we click on a Grip of an object we can move it, stretch it, etc. If we press CTRL we will copy it.
  • Pressing CTRL on AutoCAD Architecture (ACA) when we are drawing a wall, will toggle the justification line from left to right.
  • Also on ACA, when moving a grip of an AEC polygon, pressing CTRL will cycle through the different options. (see this post for more details)
  • On 3D objects, pressing CTRL will allow us to select subobjects (i.e faces)
  • On 3D objects, if we are editing faces through Grips, CTRL will togle between the different editing methods.
There are other functions CTRL performs in AutoCAD or ACA, but these are the ones I find the most useful to increase your work speed. If you know of any other, let me know!

Show me more...

AutoCAD: Fields in Dynamic Blocks to Display Properties

If you need to display certain changing properties of a dynamic block you can do it using Attributes and Fields
Català - Castellano
In a previous post, I went through the process of creating a dynamic block of an escalator with dynamic properties. The block allowed its length and width to be modified using parameters and actions. We will use that block as a reference to explain how to add a dynamic attribute.
We will attempt, as an example, to add a text that will show us the width of the steps in the escalator block. To make things simpler, you can download the block here. We will follow these steps:
  • Enter the Block Editor mode (type BE)
  • Define an attribute (ATTDEF)
  • Insert a field on that attribute
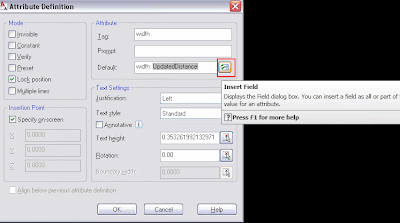
Once we are in Block Editor Mode and we type ATTDEF we will get the Attribute Definition dialog Box. Here we can tag the Attribute as Width. For its default value we will ad "Width: " and after that is where we will insert the field. To insert the field we will click on the Box near the Default value Box. See the picture below.

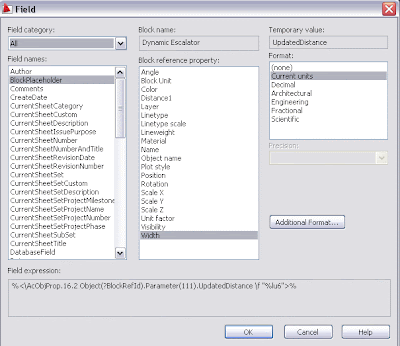
The type of field we need to add is a "Block Place Holder". We will see all the parameters of a dynamic block listed here, plus other properties such as layer, color, etc. In this case I renamed the parameter "Distance" as "Width". So I select this one.

One extra step that helps in the process is to select the attribute to be constant (so we don't get a prompt asking its value).
Update: Make sure that the attribute is NOT set to constant, otherwise it will not update when beeing modified.
Wen we finish defining the attribute we simply exit the Block editor mode and insert a new instance of the block. The new defined attribute will appear, and if we change the width of the steps (and REGEN the drawing) the field will update with the new distance.

You can download the same block with the dynamic attribute here to see it for yourself.kick it on CadKicks.com

Show me more...

Happy New Year to All CAD Addicts

The Year comes to an end with big doubts on the Architecture Industry but with hope of a Better 2009.
Català - Castellano
Just wanted to wish a Happy New Year to all CAD Addict users who joint this community during 2008, and hope for a better 2009 to everyone in the Architecture Industry. Hopefully by the end of Next year things could be a bit better and less layoffs and company closing will be happening.
Although many forecasts are very pessimistic about the evolution of the economy next year do not forget that if you make yourself indispensable wherever you work you will have a change to overcome the crisis.
As a New Year wish I intend to get even more serious into this blog, put as much time an effort as I can, try to improve both the design and the contents of this site and hopefully reach a wider audience.
Remember that you can stay update Subscribing to the blog updates in a reader or entering your email address in the box found on the upper right corner of this website.

Show me more...