Do you find yourself unable to explode certain Blocks? Don't despair, the solution is easier than you might think.
Català - Castellano - Deutsch
When a Block is created there are several options that sometimes are overlooked. One of this is the option to not allow the block to be exploded. If you don't know that this exists, you might find yourself unable to explode a block that you really, really, really need to explode (I am no fan of Block exploding, I mostly hate people who do that as a hobby, but sometimes you do need to explode them).
The trick is to open the block definition dialog box (type "b", or "block") without selecting anything. Then on the drop down list search for the block you are unable to explode. You will see that the "allow exploding" option is unselected. Select it and click OK. Now select the Block, enter X for EXPLODE. The Block should explode.
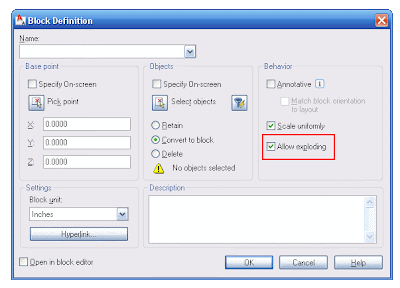
As I said before, be careful about exploding blocks (specially in a multiuser environment). If they have been created as blocks is for a reason, so exploding them might screw up someone else's effort. Remember that Blocks can be scaled, clipped using the XCLIP or CLIPIT commands, etc so consider other options before exploding them.
Show me more...
Rhino: Easy Creation of Curved Windows and Store Fronts
Creating curved Windows and store fronts might be tedious in other programs. Not in Rhino. You just need to know the right command.
Català - Castellano
Do you manually model all the curved parts of your buildings? Stop doing so. Rhino can do it for you. Let's imagine that we want to draw a curved window. We could create the curved mullions, glass, etc, or we can simply use the FlowAlongSrf command. Let me show you what this command does.
We will try to make a curved storefront following a given curve, divided in 4 parts vertically and 5 horizontally. Instead of trying to manually model it we create a flat version of it. See the image below.
To make the final result easier to handle, be sure that you Group the Storefront Mullions together. Once you have them grouped, you need to extrude the curve to the height you want the store front to be. After that you need to create a plane that matches the size of the flat store front that you have created. Something like the image below.
After we have this, everything is ready. Select the flat storefront. Type FlowAlongSrf. Select the plane near the flat storefront as base surface and select the curved surface as the target surface. These are the results.
The command FlowAlongSrf really makes modelling of curved façades much easier. See some other examples of what you can achieve with it, both based on the same 5 x 4 module.
Show me more...
Labels:
Rhino
AutoCAD: Dealing with Ellipses
Ellipses are necessary but troublesome. Learn to deal with them appropriately.
Català - Castellano
If you have a Boss like mine who loves ellipse shaped Buildings, Drop-offs, Piazzas, etc. you probably have to deal with ellipses more than you wish. Ellipses are quite troublesome.
First of all they don't offset as ellipses, rather when we offset an ellipse the parallel geometry obtained is a SPLINE. Splines have the disadvantage that they can only be trimmed but not extended.
One way to partially solve this problem is to know the PELLIPSE system variable. The default value of this paramter is 0, which means ellipses are drawn as ellipses. If we set it to 1, instead of an ellipse the geometry drawn is a POLYLINE. The advantage of using polylines is that they can be exploded (Ellipses can't) and when offset they remain polylines. Another advantage is that Polylines can be converted to other types of objects (in ACA you can convert them to Walls, Spaces, etc).
The disadvantage of drawing ellipses as Polylines is that since they are an approximation of an ellipse made with multiple curved segments, if we trim part of the ellipse shaped polyline we will probably not going to be able to recover the old geometry by using the extend command.
Another consideration when deciding if you want to set PELLIPSE to 1 or 0 is to think if you will need to modify that ellipse often. If you will be trimming and extending segments of an ellipse my recommendation is to keep it in 0 (the ellipse is a "smart object" you will be able to recover all of its geometry from its smallest segment if is a real ellipse, if it is a polyline yo will have to redraw it) If you will be offsetting the ellipse better set it to 1 so you avoid getting Splines that will leave you with no flexibility.
Another issue I found when dealing with ellipses is when I want to redraw one that is not aligned with the active UCS. For some reason the "UCS Object" feature doesn't allign properly with the axis of ellipses. So, if you want to draw an ellipse using the same alignment for its axis as a previous one this is what you need to do.
You need to know the concept of Quadrant Osnap. In ellipses (and circles) quadrant osnap is a point on the ellipse that intersects the ellipse axis. See the three images below for a clearer explanation (click on the image to enlarge)
The image on the left shows a selected ellipse. The grips we see correspond to the centre and quadrant osnaps of the ellipse that we will use to get the righ UCS alignment. The image in the middle shows how we can access the Osnap contextual menu to select the quadrant osnap. (follow this link for more info on the topic). The image on the right shows the line from quadrant to quadrant drawn. We will use the align UCS to Object to this line to get the correct UCS that will allow us to redraw an ellipse equal or parallel to the original one.(This only works with Ellipses drawn with PELLIPSE = 0).
Show me more...
Labels:
AutoCAD,
System Variables
AutoCAD: Muiltiple XREF repath - The Reference Manager
AutoCAD Installs an external application that allows you to repath multiple XREFs.
Català - Castellano - Deutsch
The Reference Manager is a utility introduced in AutoCAD 2004 that is not very well known since it is external to AutoCAD itself. The purpose of it, as it name states, is to Manage the External References.
To access it you need to go to Start --> Programs --> Autodesk --> AutoCAD 20XX --> Reference Manager.
The interface is pretty simple. The main use I found for it is to re-path XREFs that have been moved to different folders. You cans elect all the XREFs that need re-pathing, right click on them and click "Edit Selected Paths". See the image below.
The Reference Manager allows you to Manage any file that a drawing uses as a Reference, such as plot style tables, Fonts, Images and XREFs. Being Images and XREFs the ones that most commonly are misplaced, this are the types of files that you will most commonly re-path through the Reference Manager.
Re-pathing is something that you can do in AutoCAD using the XRef Manager, the Image Manager, etc. But when a file that was referenced in 100 drawings has been chenaged of location, you don;t want to enter those 100 drawings and repath this XREF in each one. The Reference Manager allows you to do this for the 100 drawings in a few clicks.
What I miss in the Reference Manager is the option to not only repath (choose the folder of the XREF) but also choose a new XREF. Sometimes the broken path is due to a change on the name of a file rather than a change of location. It would be great if the Reference Manager allowed us to point multiple files to the new XREF.
Show me more...
Rhino Plugins: Block Editor
Rhino does not have Block Editor by default, but there is a plugin for that.
Català - Castellano
If you start using Rhino like me coming from an AutoCAD, Microstation and/or SketchUp background you'll be used to create Blocks, Cells or Components, to edit them later.
Rhino by default does not have a Block Editor so you might find yourself a bit lost if you imported a file in Rhino from other applications that work with Blocks or similar entities.
No problem. Rhino, very similarly as SketchUp, has a wide range of Plugins to enhance its functionality. One of this is the Block Editor plugin, that will add the needed functionality to your Rhino. To download it go to this link. The Mcneel website has plenty of information about how to install plugins.
You need to use the PlugInManager command to load the Plugin, browse to the location where you have the plugin stored and click OK. After that you can select a block and run the command InPlaceBlockEdit to edit the block.
To manage Blocks Rhino has the BlockManager that allows you update and delete existing blocks and linked files.
Show me more...
Follow CAD Addict on Twitter
Now you can follow CAD Addict also on twitter
Some months ago I started to use twitter. Since it seems to be working pretty good and I keep getting new followers almost every day I thought I'd share with everyone the possibility to follow the posts directly from your Twitter account. To do so, follow this link and click follow, if you don't have a twitter account you'll have to register first.
Remember that you can also subscribe to the RSS feed using the links on the upper right corner of the CAD Addict website.
For those using Facebook, I also created a page through NetworkedBlogs application.
Show me more...
Labels:
General
AutoCAD: Disable XREF Preview
Disable the XREF Preview to improve performance on the Select Reference File contextual Menu.
Català - Castellano
When XREFs are big files or have big image files attached to it they might become a problem if your computer is not very powerful. As I mentioned on a previous post, you can optimize performance by using the old XREF Manager instead of the new External References Palette.
One more way to improve performance is to tell AutoCAD to not show a preview of the XREF when using the "Select Reference File" pop up window. I can't tell right now which versions have this options, but I can confirm that ACA 2009 has it. See the picture below.
Unchecking the option "Preview" under the "Views" menu on the upper right side of the Dialog will stop showing XREF Previews making everything faster and smoother.
Show me more...
Labels:
AutoCAD
SketchUp Plugins: Creating Tensile Like Structures
Learn about a Plugin that will allow you too create Curved Tensile-like surfaces.
Català - Castellano
Soap Skin Bubble is a Plugin developed by Josef Leibinger intended to represent tensile like structures.
The truth is that as you will learn with some practice, it is a tool to create almost any curved surface based on it´s profiles. THe plugin includes a Flash animation that I am including below and that quickly shows some of the features of this Plugin.
The Plugin use is not very intuitive, in the beginning you might think it is not working properly. Just give it some trial an error and you´ll see you can achieve almost any shape with it, so it is worth the time it takes to get used to its "weird" behaviour.
You can download the Plugin here directly on the developer website. You can find some more information and examples that will help you understand better how to use the Plugin.
Show me more...
Rhino: Commands List
A quick reference of commands for Rhino.
Català - Castellano
Rhino is a great tool for designing and modeling complex shaped buildings. We've have recently increased in my office the use of this tool and it is giving results far better than what we could achieve with SketchUp, so expect to get also tips about Rhino once in a while.
I have started lately to get some time to restart my Rhino training and one of the first things I was looking for was a list of commands. The help provided with the program is actually great. For an online list of commands you can go to the McNeel website where the list is reproduced.
This post will be in the future the directory where I will update any commands I find specially important to know when using Rhino.
Show me more...
Català - Castellano
Rhino is a great tool for designing and modeling complex shaped buildings. We've have recently increased in my office the use of this tool and it is giving results far better than what we could achieve with SketchUp, so expect to get also tips about Rhino once in a while.
I have started lately to get some time to restart my Rhino training and one of the first things I was looking for was a list of commands. The help provided with the program is actually great. For an online list of commands you can go to the McNeel website where the list is reproduced.
This post will be in the future the directory where I will update any commands I find specially important to know when using Rhino.
- BlockManager: Updates and deletes Blocks and linked files.
- FlowAlongSrf: Transforms a group to match any type of curved or flat surface.
- InPlaceBlockEdit: Edits Blocks in Place (requires the Block Editor PlugIn)
- PluginManager: Allows you to load Plugins
- SoftMove: Moves objects according to their distance from a central point.
Show me more...
Labels:
Rhino
AutoCAD: Attachments or Overlays?
Know what it means to use Attachments or Overlays as XREFs. It is important to avoid file troubles.
Català - Castellano
XREFs can be inserted as Overlays or as Attachments. That choice will affect the behaviour of the drawing where they are inserted.
You will get a warning message when this happens, and remember, when you do is it time to consider what are yo doing. Circular references are number 1 ingredient i a recipee for disaster.
In general, when projects get more and more complicated, the amount of circular references could be so big, you will have big trouble detaching XREFs or worse you will be unable to batch Plot, etransmit files, etc.
In my team we have long ago decided to not use attachments at all, since they have been giving us a lot of trouble.
The use of attachments is in general only justified to save some steps reattaching drawings. On certain situations, you might choose to use them, sometimes it feels almost unavoidable, but remember the possible problems described when doing so and consider if an overlay would do the trick.
My advice is to use always overlays, only use attachments wisely and because you feel there is no other option. And s a general rule, if you are in charge of the file structure of a project, don't let anyone else use attachments except with your permission. Knowing who is using attachments and why will allow you to control where the problems could arouse and how to solve them.
Show me more...
Català - Castellano
XREFs can be inserted as Overlays or as Attachments. That choice will affect the behaviour of the drawing where they are inserted.
- Overlay: Inserting a drawing A as an overlay in drawing B is the equivalent of just allowing that external reference A to bee seen in the current drawing B. The external reference does not become part of that drawing. When inserting drawing B in another drawing, let's say C, A will not appear.
- Attachment: Attachments work the opposite way. An external reference inserted as an attachment becomes part of the drawing where it is inserted. In this case, drawing A would become part of Drawing B when inserted as an attachment. They would still remain two separate drawings, but any time we'd attach drawing B in lets say drawing C, drawing A would be attached too since it is "part" of drawing B.
You will get a warning message when this happens, and remember, when you do is it time to consider what are yo doing. Circular references are number 1 ingredient i a recipee for disaster.
In general, when projects get more and more complicated, the amount of circular references could be so big, you will have big trouble detaching XREFs or worse you will be unable to batch Plot, etransmit files, etc.
In my team we have long ago decided to not use attachments at all, since they have been giving us a lot of trouble.
The use of attachments is in general only justified to save some steps reattaching drawings. On certain situations, you might choose to use them, sometimes it feels almost unavoidable, but remember the possible problems described when doing so and consider if an overlay would do the trick.
My advice is to use always overlays, only use attachments wisely and because you feel there is no other option. And s a general rule, if you are in charge of the file structure of a project, don't let anyone else use attachments except with your permission. Knowing who is using attachments and why will allow you to control where the problems could arouse and how to solve them.
Show me more...
AutoCAD: Getting Back the old XREF manager
Are you missing the old and simple XREF manager? Don't worry, it is still there.
Català - Castellano
Since version 2007, AutoCAD uses by default the External References Palette instead of the old XREF Manager to handle External References and Images all in one interface.
Although it is useful to have a palette always on to handle XREFs, it is sometimes a big annoying to have all images and XREFs listed. What we do with images and XREFs tend to be pretty different, so it could be good to see only the XREFs listed if we wanted.
If we add that the External Reference Palette tends to be much heavier in terms of computer resources used, we have enough reasons to want to old XREF manager back. That wish is granted just by knowing that the old XREF was never deleted from AUTOCAD (at least till the day and version 2009), and it can be accessed typing CLASSICXREF. See the image below where I have the new External References Palette and the old XREF both showing on the screen.
I have my list of aliases customized so XR points to CLASSICXREF instead of opening the External References Palette. By typing IM (for Image) I still get to access easily the new External References Palette. (note that the old Image Manager can also be accessed using the CLASSICIMAGE command)
Show me more...
Finding Any Possible Vehicle Turning Radius
Do you need to find out if you have enough space for vehicles to turn? There is a pogram to draw any possible turning radius.
Català - Castellano
If you are designing a parking garage and have very narrow turning spaces or if you are trying to fit a service dock in an area where you are not sure if the trucks will be able to manoeuvre a template showing the inner and outer turning radius might not be enough.
What you need is a program that can simulate the trajectories of Cars, Trucks, Buses, etc. And there is one. The awesome piece of software created by Transoft Solutions is called AutoTURN. It is a commercial product with a price that varies depending on the type of license (we inquired at work some months ago and the price given for our type of license was around $250), but if you are into any kind of Site Design, Road Design or anything involving vehicle movement it is worth the price in a single use.
Let me show you a quick snapshot so you can get an idea. Recently we've been trying to figure out if we could fit a Service Dock for 4 SemiTrailers 16.50m long in a pretty tight piece of a project. With AutoTURN we managed to see that we did have enough space making some little adjustments on the project.
The Program works both on AutoCAD and Microstation platforms, it has a very wide range of vehicles for many different countries, works both in metric and imperial unit systems and I insist it is amazing how useful it is. Just imagine the fees you could save on Traffic Consultants...
You can download a Demo Version going to the AutoTURN Website to give it try with only one vehicle type (an articulated Bus).
Show me more...
Labels:
AutoCAD,
Microstation
Subscribe to:
Posts (Atom)