AutoCAD: Placing Objects Along a Curved Path

Need to place obects evenly along a curved path? Two Commands will do that for you.
Català - Castellano - Deutsch
Placing objects evenly spaced and properly aligned along a curved path is something I have to do pretty often. Either if it is because I need to place trees along a curved sidewalk or because I want to have a floor pattern that smoothly adapts to a curved shape. The commands DIVIDE, and specially MEASURE are ideal for this task.

These two commands work in a very similar way, DIVIDE let us place objects evenly along a path, dividing the path in the number of segments that we assign, while MEASURE will allow us to choose the distance between elements. To use these commands to place objects, we need to make a block of the objects we want to place along the path. Name the block with an short and easy to remember name because you will have to type it manually.

If for instance, we want to place trees every 10 meters along a sidewalk of a road, we need the block of the tree we want to place (for this example let's imagine a block called tree01), we need the entire curved sidewalk to be a polyline, and to make it easier we need a guide paralel to that sidewalk curb that will be along which we will place the trees. See the image below that describes the needed elements.
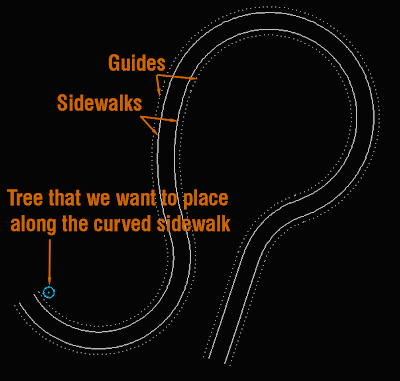

Once we have this, we simply need to run the command MEASURE (you can simply type ME), select one of the guides when prompted "select object to measure". Then we will enter "B" and ENTER to be able to select the block. On "enter the name of a block to insert" we type "tree01" or whatever name of the block you want to place. On "align block to object" we will generally say YES. The last thing to do is to "specify length of segment" which is the distance we want the Blocks to be apart from each other. If we repeat the process for both sidewalks, the result will be something like this.


We will use MEASURE most of the times to do this sort of block placements because it allows us to pick the distance between blocks. If we knew the number of blocks we would like to place instead of the distance between them then we would use the same procedure with the DIVIDE command instead of MEASURE.


Show me more...

CAD Addict emails are Slow in MS Outlook

I am working to find out a solution
Català - Castellano - Deutsch
Kerry and Cristophe have recently pointed out an issue with the email subscription to CAD Addict. Aparently reading the emails in Outlook has become slow since May 20th. I´ve been doing some research and aparently that is a common issue to other blogs subscriptions (see this post). I am looking for solutions althought it seems to be a bug that someone form google should fix. Please bear with me till this get solved.
ANd Again thanks for reading.

Show me more...

SketchUp Plugins: Improving the Selection Tools

Two Plugins that will improve drastically the way you can select objects.
Català - Castellano - Deutsch
I came across the next two plugins thanks to the SketchUp News website called "The Daily CatchUp". These two Plugins will help you select objects, edges or faces faster and smarter. Let's see them both.

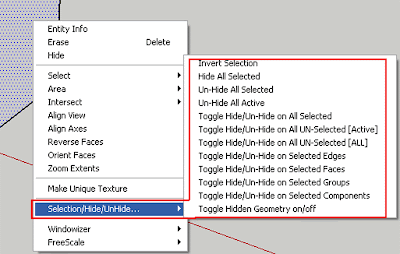
The first one is called SelectionHideShow.rb (click the link to the original post for download) and it adds extra options to the contextual menu (the right click menu). It is developed by TIG and its a great plugin to improve your selection capabilities. See this quick snapshot for the list of new selection options it will add to your right clicks.


If what you need most is to select only edges, then HoverSelect.rb from Fredo6 is your Plugin. It allows you to select edges in a new and practical way like clicking on one edge and dragging the mouse over the others, or selecting all edges of a face with a single click. It ads a user interface when the plugin is active like the one on the following image (click it to enlarge it).


HoverSelect requires the set of tools called LibFredo6 3.1 that can be downloaded here.

Show me more...

AutoCAD: How to Modify the XCLIP Frame Without Redrawing it

You can easily edit which part of an XREF is clipped without redrawing a new polyline.
Català - Castellano - Deutsch
A few months back a wrote a post about the XCLIPFRAME system variable. What I didn't know back then is that the frame shown with this system variable could actually be edited.

For those who don´t know what an XCLIP is: with the XCLIP command, we can clip (hide) part of a Block or XREF. This will allow us to keep the Block or the XREF unexploded while showing only the part of it that we want in our drawing. As I already mentioned before, I hate people who explode blocks as a hobby, but I understand they do so because they don´t know they have these options.

So back to editing the XCLIP Frame, if we set the XCLIPFRAME system variable to 1, we will be able to see the frame that is used to hide part of the Block or XREF. This frame can be modified by selecting it and moving its grips. In many cases, when we have created a very complex XCLIP Frame, this becomes extremely useful so we don't have to redraw the polyline we used to clip de Block or XREF while still allowing us to hide or show a different part of the object. I made a quick video showing the power of the XCLIPFRAME system variable. Check it out below.


Show me more...

Photoshop: Isolate a Layer

How do you Isolate a layer in photoshop?
Català - Castellano - Deutsch
This is probably my shortest post, but I've been using Photoshop a lot lately and this is a very useful trick. When you want to isolate one layer, just press Alt and click on the little eye near the layer you want to isolate. Instead of hiding that layer, it will hide all the others. To turn all the layers back on do the same. One thing though, if you manually switch on one layer while having the layer isolated, then you will have to switch all the others on manually.

Show me more...

CAD-Addict's first anniversary!!

It is CAD-Addict´s first anniversary. Tell me what would you like to see here before the second one.
Català - Castellano - Deutsch
It's been one year since I started taking this website seriously. I started it back in 2007 but not till last June I started to Blog regularly. One year is not a long time but I am happy to have helped some people find their way to work smarter, and I have to say the will to write here has forced me to find solutions that previously I might have just avoided to search for. I encourage all of you to find some time to blog about those tools you use more often, we will all benefit from the shared knowledge and you will realize that you will learn more when you have to explain to others what you just found out.

The English version of CAD-Addict had over 34000 visits in the past 12 months(over 28000 visitors) and over 75000 pageviews. I have to confess that it is much more than I expected when I started. This added to the overall more than 45000 visits if we add the other languages, make me want to blog more and more to reach more and more people. Besides that 130 people are currently subscribed to this blog's feed which is not a bad number.

To help me improve the website on the following months please don't hesitate to write a comment on this post telling me what would you like to improve on the website, or simply use the Poll on the upper right corner to quickly choose from 4 topics what would you like to change.
Again, thanks so much for reading me and feel free to contact me here if you need anything.

Show me more...

SketchUp Plugin: Shape Bender

An extremly useful Plugin to Bend an object to follow the profile of a curve
Català - Castellano - Deutsch
Not so long ago, I wrote a post about the Rhino command FlowAlonSrf (Flow Along Surface) that allows us to bend objects to match a curved surface. At that time I thought it was something I would not be able to do with SketchUp, but again the Ruby scripting community has surprised me positively.
There us a SketchUp Plugin written by Chris Fullmer that does something very similar. It is a bit less complete compared to Rhino's "Flow Along Surface", since in this case it bends objects using a curved line, but still it is a very good tool to have on your set of SketchUp tricks. See how using this tool I bended the following text to match a curved line.


I am going to post a video soon but on the mean time see the original post by Chris that already has a quick video on how to use it. You can use that post too to download the plugin.

Show me more...

AutoCAD: Select Using an Irregular Shaped Polygon

It is sometimes easier to select objects if we use an irregular polygon instead of the standard rectangular selection. And it is very easy to do.
Català - Castellano - Deutsch
When yo have a drawing with a lot of objects sometimes selection multiple objects becomes tedious because using the rectangular selection window might select a lot of objects that we do no want to select.
The solution is to select using an irregular shaped polygon. This option, generally unknown is very easy to access. When AutoCAD prompts us to select objects, we enter CP and click enter. This will trigger the "Cross Polygon" mode, which means that instead of a rectangular selection window, we will use an irregular polygonal one. See this quick video to see this option in action.


It is one of those options that it is unbelievable how many of us didn't know about it. Remember Socrates, "all I know is that I know nothing".

Show me more...

AutoCAD: How to Make a Block Unique

How do you turn one instance of a block into a unique block in a single an easy step? There is an easy way.
Català - Castellano - Deutsch
If you are a SketchUp and AutoCAD user like me, probably you miss the "make unique" option from SketchUp when you are using AutoCAD. For those who do not use SU, Make Unique will turn an instance of a Component (Blocks in SketchUp are called Components) into a Unique one, allowing us to modify it without affecting the other instances of that Component.
I always miss this is a feature in AutoCAD, but lately I came to realize that there is a way to do the same (only for 2D blocks though). The trick is to use the FLATTEN command. If we select "Sample Block 01" and run the FLATTEN command, the result will be a flattened version of the same block called "Sample Block 01-flat1". Because the new block has a different name we can modify it without affecting the other instances of that block. So the result achieved would be the same we get in SketchUp using "Make Unique".
This, of course, only works in 2D, since the command FLATTEN flattens linework, it would turn a 3D block into a 2D one.

Show me more...

SketchUp Plugins: 1001bit Tools

A Plugin with a full set of tools for Architecture to build your buildings way faster and easier
Català - Castellano - Deutsch
The commercial Plugin 1001bit Tools is an awesome set of Tools to streamline your modelling of buildings. It includes tools to do almost anything you would expect to need when modelling a building. We just purchased it at work and I couldn't wait to share it here. The tools sells for only 29 dollars, which I think is a pretty good deal for the amount of features that you get with it. See this video to check some of the features of this awesome plugin.


You can download a trial version for 30 days or purchase a license for 29 dollars.

Show me more...

AutoCAD: Convert a 3D Model into a 2D drawing with hidden line

Easily convert 3D models into 2D Objects. Choose if you want to show the hidden lines and how.
Català - Castellano - Deutsch
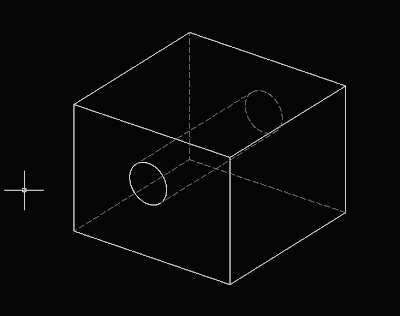
If you have a 3D model and need to extract 2D drawings from it, you should be aware of the existence of the FLATSHOT command. This command converts a 3D view of a 3D object into a 2D drawing.
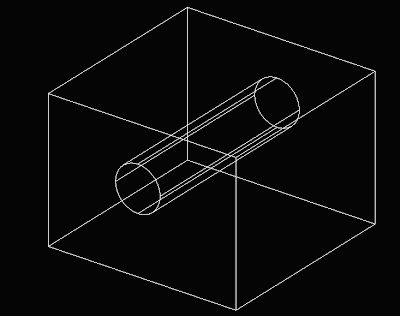
Set the view you want to flatten and run the FLATSHOT command. The result will be a 2D block that will be placed on the XY plane. See this quick example. We have this 3D Object, on this view. ANd we want to get a 2D drawing showing the hidden lines in a grey dotted style.


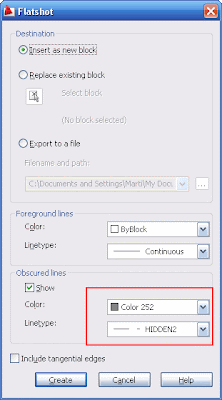
We need to run the FLATSHOT command, and on the dialog box configure the hidden line settings to match how we want to show them. You can later on edit the block, but if you want the hidden lines to show differently be sure to give them a diferent style.


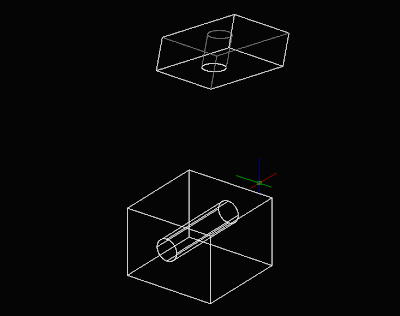
Once you have run the command, a flattened version of your view will appear on the XY plane (be sure the UCS is set to world, if you have any other UCS active, it will be used to place the flattened view)


If you set the view to top again, you will get the drawing to look as you expected.


Show me more...

AutoCAD: Scale Objects in one dimension only.

There is a way to scale objects only on one axis.
Català - Castellano - Deutsch
I used to work with Microstation long time ago and that program has the scale in one dimension as a standard option of the scale command. Unfortunately AutoCAD doesn´t. If you need to scale objects on one dimension there is a way in AutoCAD to do it though.
You need to select the objects you want to scale and create a block out of them. Be sure to create the block with the "scale uniformly" option unchecked. Then, this block can be scaled in one direction by modifying the X or Y scale. Once you have the geometry scaled as you wanted you can explode the block.
Of course it is not as precise as using the scale command, but so far it seems to be the only way to do this.

Show me more...