Do you need to extract the object properties to an excel sheet? Easy, don't do it manually.
Català - Castellano - Deutsch
Sometimes we might need to get information of some of the objects exported to an Excel Sheet to do some further calculations there. A good way to automate this process if we have a lot of objects is to use the DATAEXTRACTION wizard.
To access it simply type DATAEXTRACTION and follow the instructions. You'll be able to select which objects you want to export data from (or alternatively all the objects on a drawing or several drawings, see below)
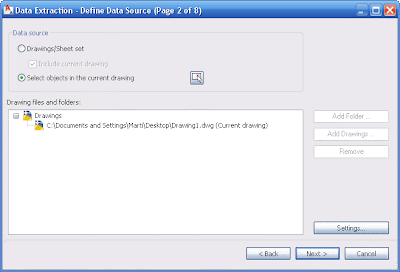
You can always select which properties of the objects you want exported (length, object type, layer, color, etc) making it simple to later differentiate the objects in Excel.
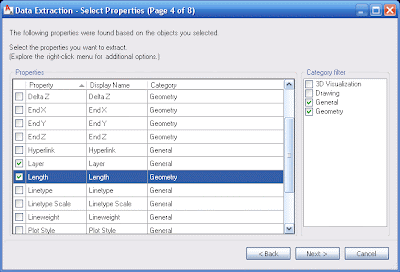
By default, Object Name and Count will also be exported. Object Count means that if you have 2 objects with their properties being identical (those that you are exporting), the exported excel sheet will only show 1 row, and a count of 2. Name, is basically the type of object. See the image with 5 lines, and the excel sheet obtained after exporting only the layer and length of the objects.
As you can see the lines with equal length and layer show only once in the table, with a count of 2. If we had included other properties in the export settings (like start X or start Y) the lines would not have been grouped because the data extracted would be different.
Show me more...
SketchUp: Easy Paint different Objects with Random colors
Need to paint a bunch of faces randomly? Don't do it manually, there is a plugin for that.
Català - Castellano - Deutsch
Chris Fullmer published a while ago the plugin clf_extrapolate_colors.rb that allows us to paint a bunch of faces with random colors. It is very easy to use and it allows a good level of control on the randomization process, i.e. which colors should appear more often, etc.
On the smustard page where you can download the plugin there is also a very useful video posted by Chris that explains more in depth what this plugin is capable of.
Show me more...
SketchUp 7.1 Released
New update available.
Català - Castellano - Deutsch
I am quite late on this, last weeks my access to internet has been less regular than desirable. In any case, a new update on SketchUp is out. Version 7.1 brings some new features, so far nothing impressive though for what I've seen from the videos posted at the Official Google SketchUp Blog. Judge by yourself.
New Tools in SU to model context
New Tools in Layout 2.1
As I said before, so far I am not impressed by this new features. What about you? Did any of you try them? Are they worh updating to 7.1?
Show me more...
Labels:
SketchUp
Maxwell Render 2 is Out!
Finally Maxwell 2 is out. No more waiting, time to give it a try.
Català - Castellano - Deutsch
A couple of months ago we saw that Next Limit was getting ready for a new release of Maxwell Render. Well, it is finally out, Maxwell Render 2.0 is here, so it is time to give it a try. So far only existing clients can upgrade.
As soon as I get time to try it, I'll post my thoughts about the new features.
Show me more...
SketchUp Plugins: Simplify Contours
Simplify your inework to optimize your model. Specially useful for site modeling to make terrains simpler.
Català - Castellano - Deutsch
Site modeling can become an issue because the model can become very heavy, specially if we model complex topography. The best way to create a 3D model from your topographic lines is to use the SandBox tools. Simply follow this process.
This will create a terrain, but depending on how detailed your topo lines where, this might create a very heavy (in terms of memory) terrain. If you don't need 100% accuracy on how the terrain is modeled (and almost no one does) and want to optimize your model size, use the SimplifyContours.rb Plugin. This Plugin allows you to select the topo lines (Contours) and simplify them as much as you want/need. If your original topographic lines were splines in AutoCAD this is definitely a must, otherwise your model will become unbearably heavy.
This is a pretty old plugin, but still 4 years later it can save you from a struggle with a super heavy terrain model. Download it here if you please.
Show me more...
Català - Castellano - Deutsch
Site modeling can become an issue because the model can become very heavy, specially if we model complex topography. The best way to create a 3D model from your topographic lines is to use the SandBox tools. Simply follow this process.
- If you have a cad file with the topo lines at the right height each, simply import it to SketchUp (File --> Import --> Select DWG as the file format)
- Then select the topo lines in SketchUp and click on the "from Contours" button in the Sandbox Tool Bar.
This will create a terrain, but depending on how detailed your topo lines where, this might create a very heavy (in terms of memory) terrain. If you don't need 100% accuracy on how the terrain is modeled (and almost no one does) and want to optimize your model size, use the SimplifyContours.rb Plugin. This Plugin allows you to select the topo lines (Contours) and simplify them as much as you want/need. If your original topographic lines were splines in AutoCAD this is definitely a must, otherwise your model will become unbearably heavy.
This is a pretty old plugin, but still 4 years later it can save you from a struggle with a super heavy terrain model. Download it here if you please.
Show me more...
Labels:
Downloads,
File Clean Up,
Plugins,
Site Design,
SketchUp
AutoCAD: List of Reference Objects
A complete and Organized list of the AutoCAD reference Objects for Annotation and links to those explained in CAD Addict.
Català - Castellano - Deutsch
Following the previous posts about Lists of AutoCAD Objects here comes the next list. This time about the objects intended as references (ie, XREFs, Blocks, Imafes, etc).
The series of "list of AutoCAD Objects" will have one last post about Actions and Parameters for Dynamic Blocks.
Show me more...
Català - Castellano - Deutsch
Following the previous posts about Lists of AutoCAD Objects here comes the next list. This time about the objects intended as references (ie, XREFs, Blocks, Imafes, etc).
- Block Reference
- Detail Component
- DGN Underlay
- DWF Underlay
- External Reference
- Keynote
- MInsert Block
- OLE
- Raster Image
The series of "list of AutoCAD Objects" will have one last post about Actions and Parameters for Dynamic Blocks.
Show me more...
Labels:
AutoCAD
SketchUp: Save And Reuse Your Custom styles
How do you use a style you created in one model on a different model? How do you transfer/export styles?
Català - Castellano - Deutsch
Personalized styles in SketchUp are important to create your own look on your models. Transferring styles from file to file is not just a copy and paste process (although it can be done that way). The best way to do it is as follows.
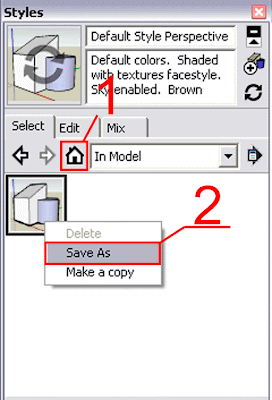
To save the style, Once you have it defined, go to the Styles Window (Window --> Styles) and do this:
To apply the style you just saved to a new model, open the new model and do as follows:
Now you should be able to see the style created on your first model from your second model.
Show me more...
Català - Castellano - Deutsch
Personalized styles in SketchUp are important to create your own look on your models. Transferring styles from file to file is not just a copy and paste process (although it can be done that way). The best way to do it is as follows.
To save the style, Once you have it defined, go to the Styles Window (Window --> Styles) and do this:
- Click on the "In Model" button to see the style you have created
- Right click on the style and select "Save As"
- Create a Folder where you want to store your personalized styles
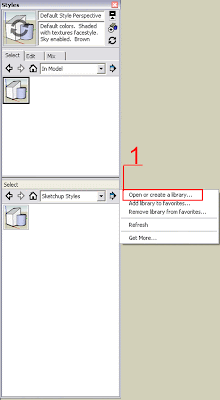
To apply the style you just saved to a new model, open the new model and do as follows:
- Open the Style browser (Window-->Styles)
- Click the "Details" Button on the lower right side (see number 1 on the image below)
- Click on Open or Create Library
- Select the folder where you saved the style on the previous step
Now you should be able to see the style created on your first model from your second model.
Show me more...
Labels:
SketchUp
SketchUp Plugins: Extrude Multiple faces at Once
Is there a way to offset a bunch of faces at once? There is a Plugin of course.
Català - Castellano - Deutsch
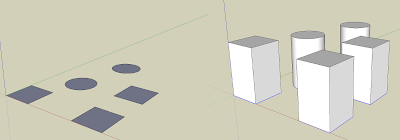
If we want to extrude (push/pull) a lot of faces the same distance, we might use the default SketchUp Push Pull tool, but it might take very long if we have a lot of faces. By default, if we push one face and then double click on different one, the new one will be push/pulled the same distance.
But what happens if we have 100 faces and we want to push them all the same distance? We need a piece of code to do that. The simplest ruby I found is called multiple_push_pull.rb. It does exactly that. We select all teh faces we want to extrude, go to Plugins --> Multiple Push Pull (after installing the Plugin of course). The result will be all the faces extruded the same distance. See this couple of examples.
I don;t know who wrote the plugin originally since the code doesn;t have any credits. In any case you can download it here.
Show me more...
AutoCAD: List of Annotation Objects
A complete and Organized list of the AutoCAD Objects for Annotation and links to those explained in CAD Addict.
Català - Castellano - Deutsch
Following the previous posts about Lists of AutoCAD Objects here comes the next list. This time about the objects intended for annotation.
If you think there is any missing Annotation Object, please post a comment here
Show me more...
Català - Castellano - Deutsch
Following the previous posts about Lists of AutoCAD Objects here comes the next list. This time about the objects intended for annotation.
- 3 Point Angular Dimension
- Aligned Dimension
- Angular Dimension
- Arc Length Dimension
- Attribute
- Attribute Definition
- Diametric Dimension
- Jogged Dimension
- Leader
- MText
- Multileader
- Ordinate Dimension
- Radial Dimension
- Rotated Dimension
- Text
- Tolerance
If you think there is any missing Annotation Object, please post a comment here
Show me more...
Labels:
AutoCAD
AutoCAD: List of 3D Objects
A complete and Organized list of the AutoCAD 3D Objects and links to those explained in CAD Addict.
Català - Castellano - Deutsch
Following the List of 2D Objects posted last week here comes this next post of the series.
In this case, some of the Objects appear mostly as parts of other objects, like Body or Surface Objects.
Show me more...
Català - Castellano - Deutsch
Following the List of 2D Objects posted last week here comes this next post of the series.
- 3D Face
- 3D Polyline
- 3D Solid
- Box
- Cone
- Cylinder
- Pyramid
- Sphere
- Torus
- Wedge
- Extrusion
- Sweep
- Revolve
- Loft - Body
- Helix
- Polyface Mesh
- Surface
- Extrusion
- Loft
- Planar
- Revolve
- Sweep
In this case, some of the Objects appear mostly as parts of other objects, like Body or Surface Objects.
Show me more...
Labels:
AutoCAD
SketchUp Plugins: Layer Manager
Manage Layers in SketchUp as if you were in AutoCAD. A great Plugin by Didie Bur
Català - Castellano - Deutsch
One of the main reasons why using layers in SketchUp was never very comfortable was the layer manager. The way the default layer manager works is not very practical (this is my opinion, but I really tend to forget about sing the different layers I created because of the Layer Browser).
Didier Bur and his LAYER MANAGER plugin have solved this issue. Layer Manager will add two toolbars to SketchUp that will make your life incredibly easier. This are the two toolbars you'll get.
Layer Manager basically works to create and manage layer states. This means for those who are not used to use layers, to save the state of the layers at a certain point (like having layer A and B visible and Layer C and D hidden) and be able to recover it at any point of time.
Layer Tools works to switch between current active layers, to move objects from layer to layer, and much more.
The best way to learn all the great functionaity of this Plugin is to Download it from the original Sketchukation thread (you need to be registered) and read the PDF that comes with the download.
Show me more...
SketchUp Plugin: Draw Polylines, Bezier Curves, Splines and Chamfered PLines
Do you find the default Bezier curve tool hard to use? This plugin will make dealing with Bezier Curves and other 2D geometry much easier.
Català - Castellano - Deutsch
Fredo6 has been busy again creating another amazing Plugin to draw, and most important, edit bezier curves. With it you can draw bezier curves, polylines, B-splines, Courbettes (multi tangent arc polyline), Catmull Splines, F-Splines... Yeah I don't know either the exact meaning of most of these terms, but they are very useful as different methods to draw curves. The best as I mentioned is the possibility to edit them using their control points. This is the toolbar that will appear when you install the Plugin.
The Plugin can be found here. For an extra feature (drawing chamfered Polylines) you will need the extension posted here. To download both the plugin and the chamfer extension, you will need to be registered at Sketchucation.com. See some shapes generated with the different curves and the option "close loop nicely".
Show me more...
Subscribe to:
Posts (Atom)