AutoCAD 2010: New System Variable to Fade XREFs

AutoCAD 2010 has a new system variable to fade XREFs.
Català - Castellano - Deutsch
New versions come sometimes with some nice surprises. One I just discovered by using AutoCAD 2010 at work is the XDWGFADECTL system variable. We had seen long ago on a previous post how to control the fading of locked layers and the objects seen outside the REFEDIT mode. Just as a quick reminder on that since that is a very old post.

LAYLOCKFADECTL directly controls the intensity of the fading of locked layers.
XFADECTL is used to control the fading when we enter the REFEDIT mode (everything that does not belong to the XREF that we enter to edit in place will be faded).

This was what we had available so far. In case we wanted to fade the XREF, my common procedure was to set the fading of the LAYLOCKFADECTL to between 30 and 50% (depending on the screen), be sure that all my XREFs where in one layer, and lock that layer. This would allow me to see my XREFs fades, making very easy to understand what was in the current drawing and what was a reference.
The only problem with this is that sometimes, when we had to move those XREFs, we had to unlock the layer and lock it after finishing the operation. Minor nuisance maybe, but it has disappeared from now on.

XDWGFADECTL is one of the new system variable added to AutoCAD 2010 that allows to control how XREFs are faded. It is useful. It might seem a minor tweek, but when you are using a dwg as an underlay to draw something else, it is really practical to see this dwg faded. And although this could be done before with the locked layers fading, now we have a second way to do it to suit every situation (or almost every)

Remember that there is a list of all the system variables that have been explained at CAD-Addict following this link.

Show me more...

AutoCAD: SaveAs 2004 Script

A script to save your drawings on a previous AutoCAD version.
Català - Castellano - Deutsch
As I promised on a previous post about Running Scripts on Multiple AutoCAD files, here comes the script to save your files as 2004 version. I found the need of this script recently, when a collaborator of mine was working with AutoCAD 2004 (i didn't know that in advance) and I was working with 2010. After finishing the tweaks on some of the files, he asked me "can you convert them to 2004, otherwise I can't read them". Well there were nearly 40 drawings, so I had no intention to save them one by one to 2004 format. I set myself to generate a script to do that for me.
This is the script file SaveAs2004.scr and let me easily explain how it works. Let's analyse it line by line.
FILEDIA 0 - This line turns off the dialog boxes (see this post for more info)
SAVEAS 2004 Y - this part is the proper saving as 2004 version. we call the saveas command, stipulate 2004 (or any other version we want) and then click yes, because the program will ask us if we want to overwrite the existing file. note here that there are 2 spaces between 2004 and Y, this is due to the fact that the first is to enter 2004, and the second is needed, to confirm the file name. (If you want to understand this better, run the different commands manually with the FILEDIA system variable set to 0, and you will be able to see all the steps I am following).
FILEDIA 1 - here I simply wanna make sure that after running the script the settings return to what they were, so i set the FILEDIA SV back to 1.
CLOSE - Closes the file, be sure that there is a space or an enter after close, since it is easy to forget that being the last text in the script file. This is generally not neecessary if you use a batch scripting program such as Autoscript or ScriptPrp, but in case you run the script directly in one file, this will close the file after running it.
That's it, now you have a script to save as 2004 version. Replace 2004 by, R14, 2004, 2007, 2010, Standards, DXF or Template, and you will save in that format.


Show me more...

AutoCAD on the Cloud: Project Butterfly

AutoCAD goes cloudy! The future is here!
Català - Castellano - Deutsch
I just learned through Revit3D.com of the existence of something called project butterfly. What is it? It is basically AutoCAD running on a web browser.
One of the latest tends in software development is to turn regular Programs into programs that can run "on the cloud". Run on the cloud means that you don´t need to install any other software other than a web browser, and that the files are stored on a public server, not in your hard drive or intranet.
For many years I have been using Google Docs, which allow you to create Word and Excel Type of files (the functionalities are less than with MS Office or Open Office) and the files can be edited collaboratively by different people.
Well, this has now arrived to AutoCAD. With Project Butterfly you can upload a file to the cloud, share it with collaborators/consultants and edit it without even having AutoCAD installed in the computer. Of course, do not expect the speed and easy of use of "real" AutoCAD, but for small corrections and collaboration, it seems like an awesome idea.See a snapshot of the Project Butterfly Interface (click the image to enlarge it)
.

You can read more on the Autodesk labs blog and try Project Butterfly here.

via revit3d.com


Show me more...

AutoCAD Architecture: Recover the Menus Part II

Autodesk keeps making our lives more difficult. Fortunately, there is a way around most of the time...
Català - Castellano - Deutsch
I wrote the other day about how to ditch the ribbon and recover the standard Menu Bar. Well, that solution worked for my AutoCAD 2010 at work. Unfortunately at home I installed the AutoCAD Architecture 2010 Student Version (I am a student too). When I tried to follow the steps exposed on that previous post, I got a message saying, "No Menus are Defined". Apparently, Autodesk is trying to force the use of the Ribbon, so is supplying copies of AutoCAD "menu naked"
The partial solution to this problem was found via the Autodesk Discussion Group. If you download this Zip File and follow the instructions described in it, you will get some of the menus back. Although I think I am still missing some of them...With this solution I got the Menus: File, Edit, View, Insert, Format, Window and Design, is that all??


Show me more...

AutoCAD: Run scripts on multiple files

You can run scripts on multiple files using ScriptPro
Català - Castellano - Deutsch
Imagine that you want to purge 100 files to be sure that not unnecessary information is saved, wasting space. Or imagine that you want to save all the drawings of a project to a previous version of AutoCAD so a consultant of yours can read your files. You don't want do it yourself or appoint someone to do it manually.
What you want is a software to Batch process scripts on multiple files, Autodesk actually provides the application for free.
This application is called ScripPro. You can directly download it here, or go to the information page.


For versions of AutoCAD previous to 2007, you'll need this version instead.
For thsoe who don't know what scripts are in AutoCAD, just imagine them as entering a set of commands without typing them manually. You can save them in a text file, and when you run the scrip file (by entering the SCRIPT command) all the set of commands will run one after the other.
I will post an example script soon, so those who are new to scripts can get a better idea of what they do. I already posted another example before explaining how to create a script to generate all your standard layers.

Update: The installer of ScriptPro is for 32Bit windows only...my 64bit windows doesn't like it, i get "not compatible with operationg system,,,crap!"
Update 2: I found this freeware software called Autoscript that runs on Windows 7 64bit. It adds a new menu called autoscript, that actually doesn't work!!! but if you type AUTOSCRIPT as a command it will run a program that works the same way as ScriptPro. Via Cadig.


Show me more...

AutoCAD: Set of Free AutoLisp Routines

A set of free AutoLISP routines for AutoCAD
Català - Castellano - Deutsch
My friend Aarti just sent me a link to a website that has collected a bunch of free AutoLISP routines. I haven't had time to check them one by one but I thought I'd post the link here in case you want to give it a look.

The one she told me she used was TLEN.lsp, that allows you to callculate the total length of a set of linear objects (lines, polylines, ecs) etc. Saving a lot of time when you have to do some measurements.

Here is the link to the list of free LISP


Show me more...

2009 Posts of the Month

The most visited posts of 2009 by month.
Català - Castellano - Deutsch
As I already did last year here comes the list of the most visited posts of each month. This is just a way to make old posts accessible to those who joined CAD Addict recently. Hope you find something interesting. This is the list.
Note that there are some months when the shown post is the second one because the most visited one was the same as the previous month. I did it like this so there could be 12 different posts here.

Show me more...

Helping Haiti

Give a bit to help Haiti
Català - Castellano - Deutsch
After the Earthquake in Haiti the situation in the country is much worse than already was before. The reports I've been reading by some journalists, are really heartbreaking.
If you feel like you want to help, but you don't want to do it through religious organizations, the link on the image below will allow you to donate through Paypal to Red Cross International and Doctors without Borders. It takes 1 minute and less than 5 clicks. It's your call.


Click on the image or here to go to the donation page.

Show me more...

AutoCAD: Get Back the Menus and Toolbars - aka Ditch the Ribbon

Do you hate the ribbon? Do you want to get back your old menubar structure with toolbars? Easy and simple
Català - Castellano - Deutsch
I hate the ribbon, I confess it. It is not only the Ribbon in AutoCAD, its the whole Ribbon concept, I hate it too since it appeared in the new version of the Office package (2007).
Fortunately, AutoCAD allows you to switch back to the old system, it is a pretty simple process. You just need to do the following:
  • Type RIBBONCLOSE (it will close the ribbon)
  • Enter MENUBAR in the command line and type "1" as a new value (it will show the menubar)
  • Then go to the EXTRAS Menu and go to Toolbars, here you will be able to select the toolbars you want to see displayed

Update: On the bottom right of the screen there is a Workspace control button that by default reads "2D Drafting and Annotation". If we change that to "AutoCAD Classic" we will get the standard interface we were used to before the ribbon appeared. Thanks to Helen for this tip.


Show me more...

AutoCAD: PREVIEWFILTER system variable

Control which objects are highlighted in the selection preview
Català - Castellano - Deutsch
The selection preview is very useful to know before clicking which object you are going to select. The only problem it has is that if your objects are very complex, generating the preview might take some time, slowing down your workflow.
A clear example of objects that create issues if previewed are hatch patterns. Some time ago, I already wrote a post on How to Disable selection preview for Hatch Patterns. This post just wants to be a more comprehensive overview of how to control which objects are highlighted.
There is a system variable that allows us to control which objects are "selectionpreviewed". Te SV is PREVIEWFILTER, and as in other SV, the sum of the following values will result in some objects beeing excluded from the preview feature.

- 0 all objects are previewed
- 1 Objects on locked layers excluded
- 2 Objects in XREFs are excluded
- 4 Tables are excluded
- 8 Multiline objects are excluded
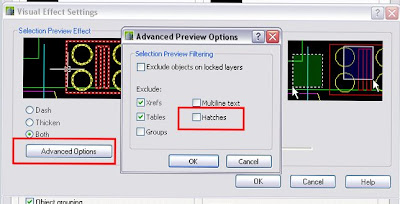
- 16 Hatch patterns excluded
- 32 Objects in groups are excluded

To exclude several object types, you need to enter the sum of the different values for this objects. For instance, if you want to exclude Hatch Patterns and Groups from selection previews, you will need to enter 48 as the value for the PREVIEWFILTER System Variable.
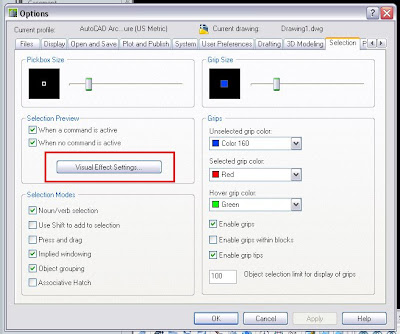
Alternatively, the controls for which objects are previewed can be accessed through Format --> Options --> Selection -->Visual Effects Options --> Advanced Options


Show me more...

SketcHup Plugins: Component Stringer

Place components along a path with this awesome plugin from Chris Fullmer.
Català - Castellano - Deutsch
Placing components along a path is now a piece of cake with this Plugin from Chris Fullmer. The components allows several options like rotating the components as they are placed, scaling them etc. It is a very useful tool. I usually had to do this sort of task in AutoCAD using the MEASURE and DIVIDE commands. Now this can be done direclty and very easily in SketchUp. See Chris's video to get a better idea of what this does.


The plugin can be downloaded here. Big thanks to Chris for another great Plugin!

Chek here how to Install SketchUp Plugins.


Show me more...

Windows 7

Anyone else hates windows 7 as much as Vista?
Català - Castellano - Deutsch
I just got a new laptop and it comes with Windows 7, I was XP user and was quite satisfied with it. Windows 7 (which to me it looks exactly like Windows Vista, my theory is that they just renamed it...)is killing me slowly...it is such a pain, so reatarded and so full of useless stuff that I am already trying to get a copy of Win XP x64 and format the laptop...
Anyone else having similar problems?

Just a few things I am struggling:
- Some programs do simply not start (like I was using Carbonite online backup, and now only works when Windows 7 decides it wants it to work)
- The notification icons on the taskbar appear and disapear when they want, the saved settings get randomly reverted to default for no reason
- Folders "don't load totally" being unable to see the icons for each type of file.

I mean, Mr Gates, stop playing with the stupid display and transparency options, and put please some time on making the system at least as fast and stable as XP.
Sorry all for the whinning, but I had to complain to someone that would listen, what is ur experience with windows 7??


Show me more...