A full set of Tools to execute diferent extrusion operations in SketchUp
Català - Castellano - Deutsch
I recently posted on some Plugins by TIG:
ExtrudeEdgesbyFace.rb,
ExtrudeEdgesByLathe.rb,
EstrudeEdgesByEdges.rb,
ExtrudeEdgesByRails.rb and
ExtrudeEdgesByLoft.rb.
These are part of a more complete set of Plugins by TIG that contains very other useful tools. The ones detailed here are the ones I found more useful (because I needed to use them), but the others are quite handy too. Installing the full set of tools from here, will add a Toolbar to SketchUp that will allow you to easy access all the Plugins on this set.
Alternatively, you can access them going to Plugins --> Extrusion Tools.
The Plugin Set can be downloaded here.
If you are new to SketchUp chek here to know how to Install SketchUp Plugins.
Show me more...
SketchUp Plugins: 4D Construction Simulation Plugins
Two Plugins to link Sketchup models with schedules and simulate the construction process
Català - Castellano - Deutsch
I was looking around for Plugins to use in sketchup to easily simulate the construction process. I am following a schedule management class, and would like to do a bit more than just the schedule part, but try to link it with a visualization of the construction model based on a simple SketchUp model. I came acrosstwo three plugins that seem to do the trick.
The first one, and the only free one, is called onTime5D. On the video below you can see a very brief preview of its functionality. The plugin seems to be in process of development, you can follow up on this on the author's website.
Thefirst second one is called xD Virtual Builder, developed by D-Studio. It can be found at their website: www.4dvirtualbuilder.com. I tried it a bit, but didn't have the time to properly test it. As described in the features, it allows you to import schedule files in xml format from MS Project, Primavera and Asta Powerproject. You can check the Getting Started Tips, and take a look at the video below to get an overview of the Program. Unfortunately, it is not free, there is a free trial, but the cheapest version (without XML import) sells at $59.
Thesecond third one is called Synchro Project Cosntructor. It is not just a Plugin for SketchUp but a full Scheduling and Project Controlling Tool. This is the reason why it is much more expensive, over $800. Nevertheless, it allows to import SketchUp Files and to then use its features to create a 4D simulation of the construction process. It imports MS Project and Primavera Files and seems more complete (it has to for the price!). Find more info on the Product Website and on the following video.
Any insights on these Plugins? Do you know of any free Plugin to create 4D simulations in SketchUp based on Schedules? Please share!
Show me more...
Català - Castellano - Deutsch
I was looking around for Plugins to use in sketchup to easily simulate the construction process. I am following a schedule management class, and would like to do a bit more than just the schedule part, but try to link it with a visualization of the construction model based on a simple SketchUp model. I came across
The first one, and the only free one, is called onTime5D. On the video below you can see a very brief preview of its functionality. The plugin seems to be in process of development, you can follow up on this on the author's website.
The
The
Any insights on these Plugins? Do you know of any free Plugin to create 4D simulations in SketchUp based on Schedules? Please share!
Show me more...
Revit Basics: Hide and Unhide Objects
How do you hide and/or unhide walls or other objects
Català - Castellano - Deutsch
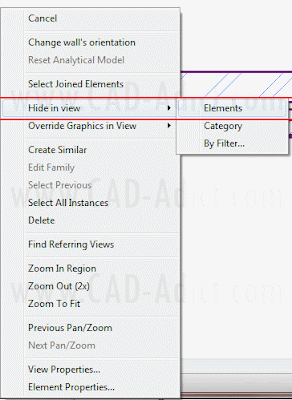
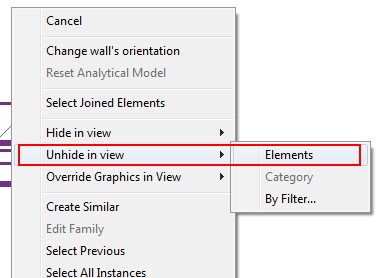
I wanted to hide a wall to be able to see the imported linework below. This took no effort to find out. Simply select the element you want to hide, right click and select Hide --> Element on the right click menu. (it can also be accessed via Ribbon)
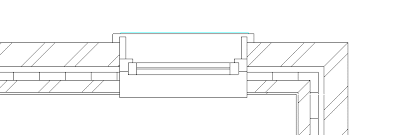
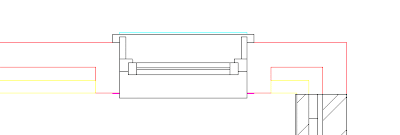
See the Element i wanted to Hide, the Wall, and once hidden how I can see the linework imported.
To Unhide Wall, Windows or any other Elements Hidden we need to activate the "Reveal Hidden Elements Button. It is on the lower left of the view.
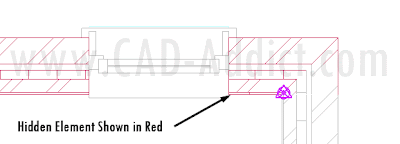
This will alow us to enter the Hidden Element Reveal interface, where hidden Elements are shown in Redish color and others are faded in Grey.
Then selecting the element and using the right click menu, or using the button on the ribbon, we can unhide them.
The same procedure can be done hiding elements by category instead of single ones, or using filters. We will see that on another post.
Show me more...
Revit Basics: Control the level of Detail of a View
Set how detailed you want a view to be.
Català - Castellano - Deutsch
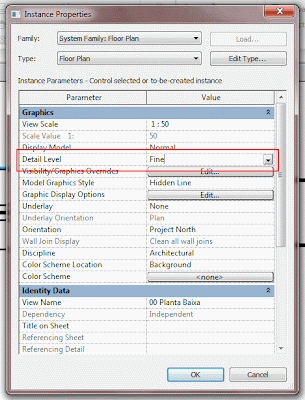
If you can't see all Layers, Parts of your model, this might probably be because your Level of Detail is not set to "Fine". To change the Level of Detail (LoD), go to the View Tab --> Graphics --> View Properties (See below).
There, go to Detail Level and set it to Fine. (See below)
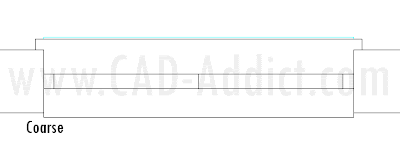
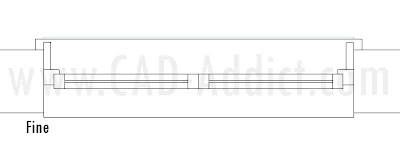
This is a useful feature that allows us to control how detailed is the model shown. I assume there is a reduction on speed by setting it to Fine, so I guess we must be careful if working with big models. Coarse is the less detailed level, and fine is the more detailed. See below the three Detail Levels for a Window.
Show me more...
Revit Basics: How to Switch Off Lineweight Display
How can you switch off the display of Lineweights in Revit?
Català - Castellano - Deutsch
The time has arrived! My first revit Post. I've been "fighting" with the interface a bit these past fewdays. One of the first things I had to solve was to find how to switch off the lineweights to be able to work with better precision. It didn't take me long, and i know this is probably not even Revit 101, so forgive me for how basic this might sound, but just in case there is someone starting to play with Revit too, here comes the Tip.
You can switch off the Lineweight display by using the View Tab of the Ribbon and going to the far left on "Graphics" and pressing the ThinLine button. Alternatively, and if you are an AutoCAD user you might prefer this, you can simply type TL. A difference between Revit and AutoCAD is that we don't need to press ENTER to use keyboard shortcuts.
I am struggling a bit getting used to the Interface but specially to the fact that I am not drawing lines anymore but modelling a Building, so no cheating seems to be allowed. Good, motivation is there, so hopefully I'll share more useful tips about Revit soon. For now probably very basic, but it is about time!
Show me more...
Free Online Generic BIM Object Library #02
Trying to find free BIM Objects online? Here comes resource number 02
Català - Castellano - Deutsch
RevitCity.com has a very nice set of Families for Revit. What is even nicer is that they have their library organized using the CSI Master Format, so if you know this Format, all objects will be easy to find by they number.
As many of these online libraries their strenght is sometimes their biggest flaw. It contains a great number of Families, but this, can become a problem when searching for some content.
One of the big challenges using Revit that I found so far, is the need to have the right families (quality and quantity). Otherwise, any time you want to place a window or a door, there are so many families to consider that you do not consider it at all. Of course, a BIM Model requires to get more detailed as project phases advance, but beeing able to see what you are doing directly in 3D, makes it kind of hard to leave an ugly door in the model as a placeholder.
I guess I am still too much on the CAD side where a window or a door are just symbols that will be described later, but I definetily find this challenging. How many manufacturers are distributing Families/Components of their products as they use to do with CAD Blocks/Cells?
Show me more...
SketchUp Plugins: Extrude Edges by Face
Extrude any face along a path. it sound like Follow Me tool? Well it is much better and faster.
Català - Castellano - Deutsch
TIG set of Extrusion Tools is great. Another Tool of this set I wanted to show you here is the ExtrudeEdgesByFace.rb. This one allows you to Extrude a face following a line or set of lines (straight or curved). I know this might sound exactly as the Follow me Tool, but it is not. The advantages compared to the Follow Me Tool is that the Face doesn't need to be properly alligned with the profile to be extruded properly. See these two images.
If you want, you can rotate the face and use the Plugin again and the result would be this one.
Another advantage of this Plugin compared to the Follow me Tool is that it allows you to do multiple Extrude Operations at the same time. Like the one below. I selected the Face and all the paths, and in a single operation i got this result.
The Plugin is part of the Extrusion Tools by TIG. You can download them here.
If you are new to SketchUp chek here to know how to Install SketchUp Plugins.
Show me more...
AutoCAD: Manage Layers with the LAYWALK command
Manage layers in a simpler way than using the Layer Manager
Català - Castellano - Deutsch
Even from the colleagues that know less about a program you can learn something new. This happened today at work. I was asked some very simple questions about AutoCAD commands. Siting near my colleague to teach him how to do things, I realised he was using a command I didn't know and that is quite useful.
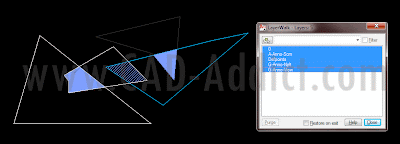
LAYWALK, is a command that allows us to handle Layers very nicely. It opens a dialog where we can see all the layers listed. The objects on the highlighted layers will be shown on the screen.
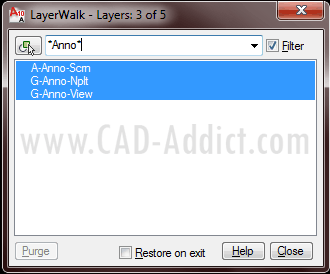
In case we have a lot of layers we can use the filter bar to only show the ones we want. Use * in front and/or after the text to include all layers with that text in it.
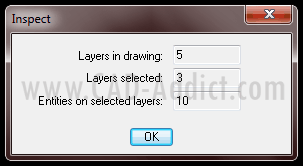
Selecting a layer or several layers and doing "Right Click --> Inspect" will show us some information about the layers and the amount of objects contained.
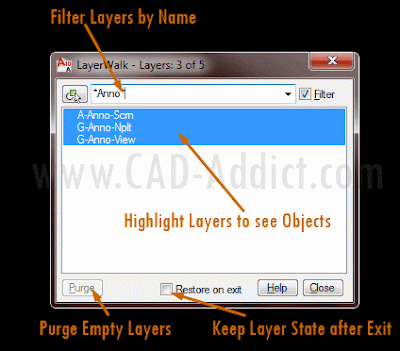
If there is any layer without any objects, we would be able to purge directly from here using the purge button. We have also the option to "resotre on exit" or not. If restore on exit is active, it means that when we close the LAYWALK window, the layer state will go back to how it was before running the command, if we uncheck this option, the layers will stay as we set them in the LAYWALK window. See a summary of fucntions below (click to enlarge).
Very useful command to manage layers and much faster (although with less functionalities) than the Layer Manager.
Show me more...
AutoCAD or AutoCAD Architecture??
How many of you are still using plain AutoCAD? Try to move to AutoCAD Architecture at least, you'll work much much faster.
Català - Castellano - Deutsch
I've been recently struggling with the experience of working with plain AutoCAD after 3 years of working with AutoCAD Architecture in a professional environment. It is hard for me to understand (other than pure commercial strategy) why plain AutoCAD still exists.It might sound weird if you are working with plain AutoCAD, but once you've tried AutoCAD Architecture, plain AutoCAD feels like someone has cut one of your arms.
The tools I miss the most are the AEC Modify Tools (see them in this post) accessible via right click context menu. Other functions that are not available and that really speed up the work are the "Select Similar" and "Add selected". Select Similar allows us to select all similar objects 8same type, layer,etc) directly from the right click context menu too. And Add Selected allows us to add an object that is the same as one selected, saving tons of time on remembering commands.
These last two functions are available in AutoCAD if you have a Subscription Advantage Pack. Here is the Autodesk page that showcases these functions. But you should know, and this is the main reason I write this post, that these functions are available in AutoCAD Architecture, so to mee, no point paying for some functions, when you could have them all.
Also, considering that the transfer to BIM will happen sooner or later, consider next time you want to upgrade , to go for the AutoCAD Revit Architecture Suite. This one contains AutoCAD + AutoCAD Architecture + Revit Architecture.
So just to wrap up and up to my own curiosity to know what my readers use every day. Could you answer this poll? What program do you use every day at work?
Thanks!
Show me more...
Labels:
AutoCAD,
AutoCAD Arch
SketchUp Plugins: Extrude Edges by Loft
A powerful Plugin to create a "Loft Surface" between curves.
Català - Castellano - Deutsch
Not so long ago, we saw the Loft Plugin by Chris Fullmer that allowed us to create Lofts between curved edges. Although the Plugin was useful, it had some imprecisions and not so much functionality.
TIG, inspired by this Plugin, has created the extrudeEdgesByLoft.rb Plugin. It is, for its functionality, like a much better version of the previous Plugin by Chris Fullmer. It creates the Loft surface with better precision from given curves, see below.
Besides creating the mesh, it allows you to choose if you want to reverse faces or soften the edges.
And even if you want to eliminate the edges you used to create the loft operation.
Another Great Plugin by TIG. It can be downloaded here (you need to be registered)together with other Extrude Tools that we will soon see here.
Chek here how to Install SketchUp Plugins.
Show me more...
Català - Castellano - Deutsch
Not so long ago, we saw the Loft Plugin by Chris Fullmer that allowed us to create Lofts between curved edges. Although the Plugin was useful, it had some imprecisions and not so much functionality.
TIG, inspired by this Plugin, has created the extrudeEdgesByLoft.rb Plugin. It is, for its functionality, like a much better version of the previous Plugin by Chris Fullmer. It creates the Loft surface with better precision from given curves, see below.
Besides creating the mesh, it allows you to choose if you want to reverse faces or soften the edges.
And even if you want to eliminate the edges you used to create the loft operation.
Another Great Plugin by TIG. It can be downloaded here (you need to be registered)together with other Extrude Tools that we will soon see here.
Chek here how to Install SketchUp Plugins.
Show me more...
Barcelona in 3D on Google Earth
My hometown is oficially launched in 3D in Google Earth. Go visit it.
Català - Castellano - Deutsch
I normally don't repost this things, but being my hometown I couldn't skip it. Barcelona is officially launched as a 3D city in Google Earth. Go see it. It's worth it. Here a brief video. Unfortunately we've been stereotyped again with some "flamenco-like" spanish guitar song. What can i say, this is not us, but in any case, and as we say in Catalan: Benvinguts a Barcelona!! (Welcome to Barcelona).
via Official Sketchup Blog.
Show me more...
Labels:
Google Earth,
Videos
SketchUp Plugins: Extrude with Rotation
Extrude Edges or faces with a rotation.
Català - Castellano - Deutsch
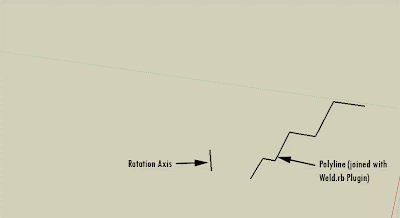
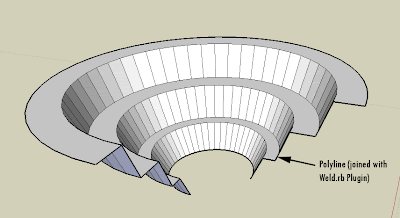
ExtrudeEdgesByLathe.rb by TIG allows us to Extrude Polylines or Faces following a circular path defined by an axis and a rotation angle. The Plugin is part of a suite of several Extrusion Plugins by the same Author that can be found here. The Plugin Allows you to do the following.
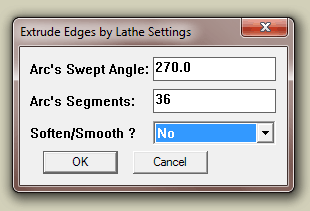
We can set all the properties of the extrusion on a dialog box that appears after we run the Plugin. These are the options for the previous example.
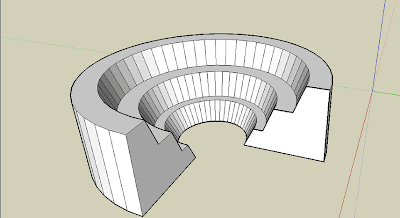
And if we select a face instead of a polyline, the plugin works too!!
Chek here how to Install SketchUp Plugins.
Show me more...
Català - Castellano - Deutsch
ExtrudeEdgesByLathe.rb by TIG allows us to Extrude Polylines or Faces following a circular path defined by an axis and a rotation angle. The Plugin is part of a suite of several Extrusion Plugins by the same Author that can be found here. The Plugin Allows you to do the following.
We can set all the properties of the extrusion on a dialog box that appears after we run the Plugin. These are the options for the previous example.
And if we select a face instead of a polyline, the plugin works too!!
Chek here how to Install SketchUp Plugins.
Show me more...
Subscribe to:
Posts (Atom)